How To Connect Google Search Console To Your Blog

How to connect Google Search Console to your blog, step by step with pictures.
This guide also shows you how to set your permalink structure, and more.
As an affiliate partner of various brands and sponsored content, HerPaperRoute may earn commission on qualifying purchases. Disclaimer
Connecting your WordPress blog to Google Search Console can be done in just a few easy steps! Read on!
How To Connect Google Search Console To Your Blog
This post covers important steps to do before you start blogging.
How To Change The Permalink Structure Of Your Blog
Make sure you change your blog’s permalink structure before you start publishing posts.
Click on “Settings” and then “Permalinks.”
Then select the “Post Name” option.
Your blog posts URL will now have the right structure.
How To Set Up Google Analytics
Follow this guide to set up the new Google Analytics. Then come back to this article to continue.
How To Connect Google Search Console To Your Blog
To easily connect your blog to Google Search Console, make sure you have the Rank Math plugin installed.
1. Go to Google Search Console (formerly Google Webmaster Tools) and sign in with your Google account.
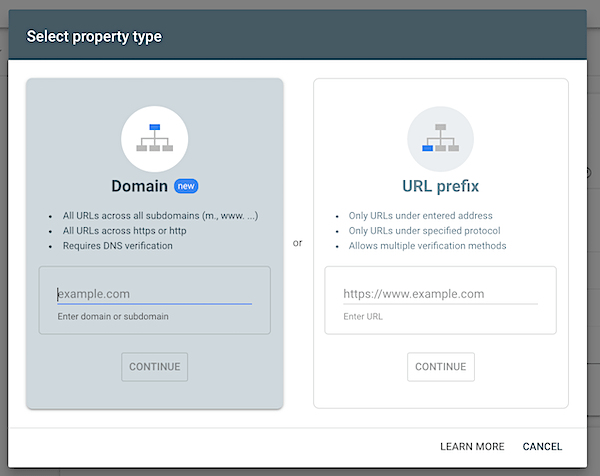
2. While logged into Google Search Console, click the dropdown button at the top, and then choose ‘Add Property’
‘Property’ means website.
3. Next, in the popup, add your website URL (the URL prefix option is the easiest).

4. Next, follow the prompts and then click the ‘ Alternative Method’ tab. You will be given a code. Copy the code, and then paste it into your website <head> section, before the <body> section.
Again, if you use a Genesis theme you can easily paste this code by going to:
Appearance » Customize » Theme Settings » Header/Footer Scripts
If you aren’t using a Genesis theme, you can use the Add Func Header Footer Plugin for this step.
Once you have done that, click ‘verify’ in Google Search console.
How To Submit Sitemap To Google
- Sign in to Google Search Console.
- On your Search Console home page, select your website.
- In the left sidebar, click Crawl and then Sitemaps.
- Remove outdated or invalid sitemaps like
sitemap.xml - Click the Add/Test Sitemap button in the top right.
- Enter
sitemap_index.xmlinto the text box that appears. - Click Submit.
Utilize The Must-Have Blog Tools List
Bookmark my must-have blog tools page for a list of essential tools, apps, resources and tech that I use to run my blogs. Most of them are free!
Don’t forget to download my free Profitable Blog Toolkit below:
The HerPaperRoute Profitable Blog Toolkit is my members-only resource library of tools to help you start a blog develop it into a thriving, income earning business!
- Profitable Blog Cheatsheet!
- Styled Stock Photos!
- Social Media Marketing Planner! & More!
- The Best Part? IT’S FREE! JOIN HERE

Follow along on Instagram!


![How To Create An Online Course [Ultimate Guide] 9 the ultimate guide on how to create an online course for successful creators](https://herpaperroute.com/wp-content/uploads/2017/12/the-ultimate-guide-on-how-to-create-an-online-course-for-successful-creators-768x410.jpg)


