How To Set Up Google Analytics G4A For Your Website

If you own a website, you need to know how to set up Google Analytics G4A.
For bloggers, website investors, and business owners, understanding your audience is crucial to success. Enter Google Analytics, a powerful tool that offers insights into your website’s traffic, user behavior, and much more.
As an affiliate partner of various brands and sponsored content, HerPaperRoute may earn commission on qualifying purchases. Disclaimer
This article will guide you step-by-step on how to set up Google Analytics for your website.
Whether you’re a seasoned pro or a digital novice, these tips will help you unlock the full potential of your website’s data.
I think it’s fair to say that Google Analytics is a must have for self-hosted bloggers, particularly if they treat their blog like a business and wish to profit from it at some point.
If you don’t have a self-hosted blog yet, then check out this tutorial and find out how to set one up!
What Is Google Analytics G4A?
Google Analytics is an online application that tracks visitors to your site. G4A is its most up-to-date version.
Now that sounds pretty basic but Google Analytics is anything but basic.
The amount of information you can gather from your Google Analytics account is incredible and can help you propel your business forward.
Why Would I Want To Track Visitors To My Website?
Tracking visitors is so important!
Firstly you can monitor if your site is improving by seeing if you are getting more pageviews or if your bounce rate has gone down.
Plus you can see where these visitors are coming from. For example, if you’re trying out a new Pinterest strategy then you can see if your visitors from Pinterest have increased.
Secondly, Google Analytics allows you to see which of your blog posts are the most popular which means you can write more of those types of posts to please your audience.
You can also check out things like the age of your readers and where in the world they’re located.
But most importantly, you need to have Google Analytics connected so that you can sell your website in the future.
Having Google Analytics installed is crucial when planning to sell your website for several reasons:
- Proof of Traffic and Engagement: It provides verifiable data on website traffic, user engagement, and demographics, which are key metrics for potential buyers.
- Valuation Support: This data helps in accurately valuing your website, as it demonstrates its reach and potential for revenue generation.
- Trust and Transparency: Providing detailed analytics instills confidence in potential buyers, showing that you are transparent about the website’s performance.
- Insights for Improvement: Analytics can reveal areas for improvement, allowing you to enhance the site before selling, potentially increasing its value.
Learn more about selling your website for profit.
Do I Have To Use Google Analytics?
Well, you don’t have to use it, but it is considered the gold standard of website analytics tracking.
If you intend to sell your website down the road, buyers will expect to see your Google Analytics traffic history. And not having it could cost you the deal.
It’s also required for being approved to premium ad networks like Mediavine, and for getting brand sposnorships.
For example, if you ever wanted to apply for a higher-paying ad network that requires a certain number of pageviews per month they would want proof of those pageviews through Google Analytics, not another random plugin.
The same goes for sponsored posts and any blogging opportunity that requires a certain level of pageviews or sessions.
Google Analytics kind of has a monopoly on blogging analytics. I mean they interact and connect with almost all the different programs you would want to use on your site (like email marketing programs, different plugins, social media accounts etc.)
Basically, if you ever plan to profit from your website you do need to install and set up Google Analytics
How To Install Google Analytics, Step-By-Step
STEP 1
Firstly you’re going to head over to Google Analytics and you should see the page below.
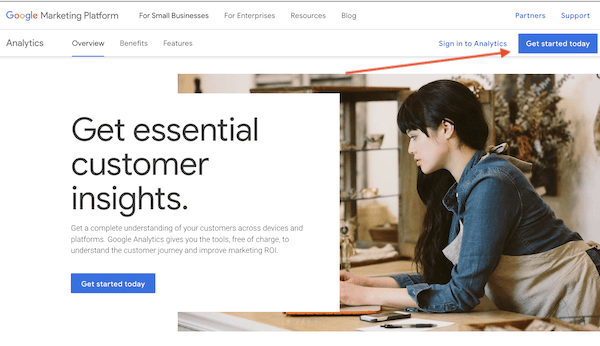
Click the blue button “get started now” and set up a new account.
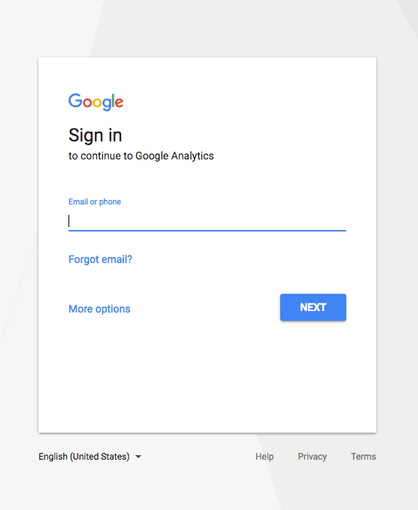
At this point you will need to sign into your Google account (the one you use with Gmail) so go ahead and do that.

If you don’t have a Google account, now’s the time to create one. Click on the ‘More Options’ button as shown by the red arrow.
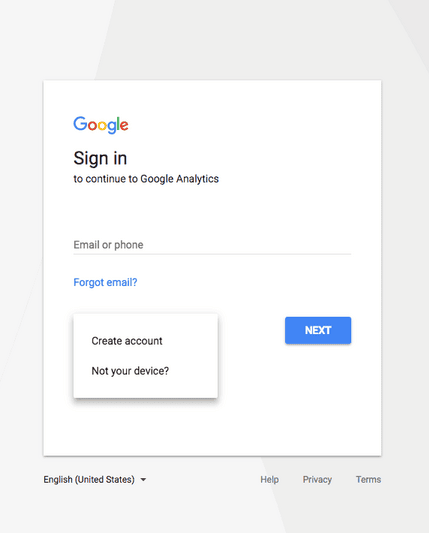
Then click ‘Create Account’.
Once you have an analytics account connected to your Google account you will be able to sign in using your Google account at any time by going to https://analytics.google.com/
STEP 2
Once you’ve signed in you may get a page telling you about new features or something like that. Just scroll down and click ‘I AGREE’ to get back to Google Analytics.
2.1 Setting up your account
To set up your account, you will be prompted to set up some information about your business. If not, simply click the CREATE+ button and select ‘Account’ and follow the prompts.
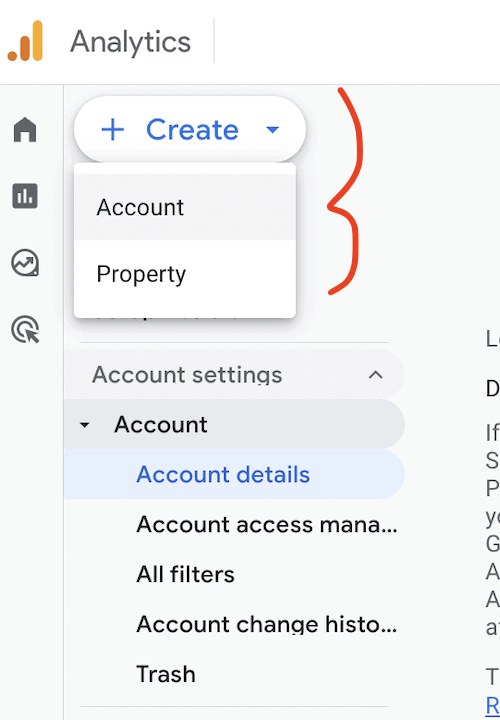
Name your account – this can be anything as it’s purely for your own records.
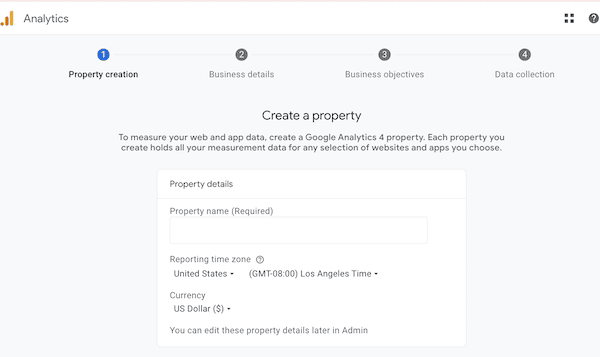
Your ‘account’ is the top-level folder for all of your websites. You will create a ‘property’ for each website you own.
2.2 Setting up your property
Next, hover over that same CREATE+ button again and this time select ‘Property.’
Follow the prompts to set up information about your website:
- Website Name – Input your website name.
- Website URL – Input your website URL
- Industry Category – Choose a category that seems most appropriate to you.
- Report Time Zone – Enter your preferred time zone.
STEP 3 – Connect G4A to your website to start tracking traffic
Now it’s time to install the tracking code onto your website.
You will get this code by navigating to ‘Data collection and modification > Data Streams’ and setting up a stream.

Click ‘Add Stream > Web.’ Follow the prompts and when you land on the ‘installation’ page, click on ‘install manually’ and copy the code in full.
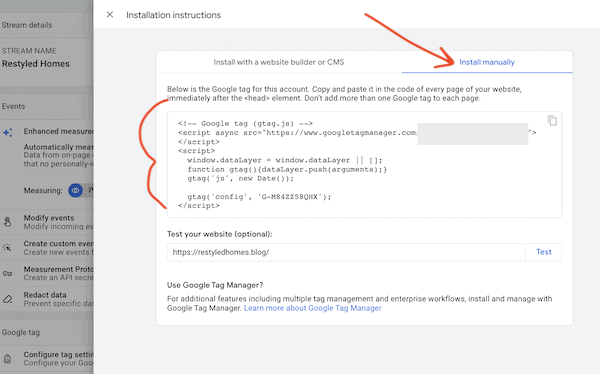
Then, log into your WordPress website and navigate to where you add code to the <header>.
Different themes have different ways of doing this. Kadence themes and Genesis themes for example have a place in the customizer to add code with the tab titled ‘custom scripts.

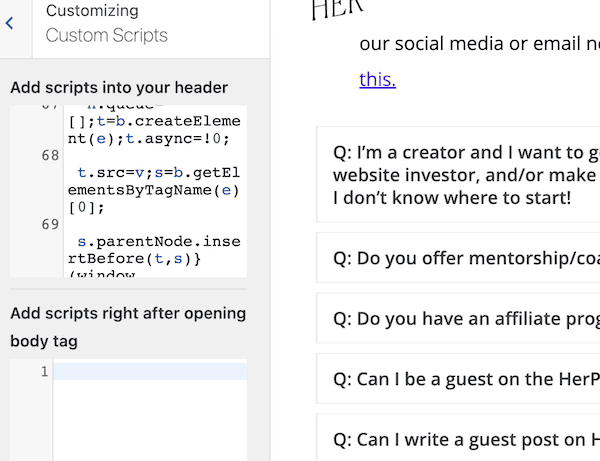
If your theme doesn’t have that, you can use a code snippets plugin to place the G4A tracking code. WPCode – Insert Headers and Footers is perfect for this.

Note: Don’t use an analytics plugin like MonsterInsights or JetPack as those plugins will slow down your site. You don’t need a plugin to view analytics – because when you want to look at your analytics, you will log right into Google Analytics to see this data.
Once you place the tracking code and save, you’re done. It was that simple!
Your Google Analytics account should all be working now although it can take a couple of days to collect data initially.
That’s it you are all done! Woohoo go you!!!
Google Analytics Glossary:
Just a few key terms that creators need to know to get the most out of Google Analytics.
Traffic – The number of people visiting your blog.
Audience – The people visiting your blog.
Pageviews – Every time one of your pages loads in a browser. So if I clicked on a link to your blog and read one post that would be one pageview, if I then reloaded the page four times that would be five pageviews. If I then clicked on a link to read another one of your posts that would count as another pageview.
Sessions – This is the number of times a person has been on your site. Each session lasts 30 minutes. So if I went on your site viewed a couple of pages and then left that would count as one session.
If I went back on your site one hour later that would count as two sessions. If however, I had gone back on your site within my original 30 minutes that would have been counted within the same session.
Bounce Rate – This represents the amount of people who leave your site having only seen one page. So a 100% bounce rate means everyone is leaving from the page they entered your site on and not exploring any more of your website.
Demographics – This gives you some useful information about your readers. On Google Analytics you can learn about their age and gender.
Acquisition – How you are acquiring (or getting) traffic.
Source/Medium – Where that traffic is coming from like a search engine or social media.
Behavior – What your readers are doing once on your site.
How To Set Up Google Analytics G4A For Your Website – Conclusion
Congratulations! You’re now equipped with the knowledge to set up Google Analytics for your website.
By implementing this invaluable tool, you’ve taken a significant step towards understanding and enhancing your website’s performance.
Remember, the data you gather is a treasure trove of insights – use it to refine your strategies, better engage your audience, and drive your online venture towards new heights of success. Happy analyzing!
I hope the blog post helps you in getting Google Analytics set up on your website. Please comment below if you have any questions!
Read this next: How to connect Google Search Console to your website.

Follow along on Instagram!


