6 Easy Steps To Start A Newsletter Today

I must share these steps to start a newsletter, because every blogger and business owner needs to have one.
Because, be honest. How many times does this happen? You’re browsing on the internet, and you come across a blog post you love. You resolve to come back to the blog and read it regularly before moving on.
As an affiliate partner of various brands and sponsored content, HerPaperRoute may earn commission on qualifying purchases. Disclaimer
Two hours later you’ve completely forgotten about this great new blog you discovered. Chances are you’ll never make it back there unless a serendipitous event reunites you with the blog a few months down the road.
Guess what… the exact same thing happens to a lot of your readers. If you don’t believe me, look at your Google Analytics stats and see how many of them are first-time visitors.
The vast majority of them will likely never make it back to your blog.
That is, unless you can convince them to join your list. Once they are subscribed to your list, you can keep bringing them back to your blog over and over again via your newsletter, and build a deeper, stronger relationship with your readers.
Here’s how to start a newsletter step by step.
How To Start A Newsletter – Step By Step
Before we get started, make sure you have your free copy of my email list starting guide:
1. Decide On The Newsletter Niche and Purpose
Starting a newsletter with a focused niche will help you build a community of people with a shared interest.
This way, you will have an easier time keeping them entertained and buying things you recommend. A niche gives your newsletter a purpose.
2. Choose An ESP Platform
Launching a newsletter and building a list is easier than you think. Start by signing up for a dependable email service platform (aka an autoresponder) such as ConvertKit or Flodesk.
3. Set Up Your Autoresponse Welcome Email Sequence
When someone signs up for your newsletter, you’ll want them to receive a welcome email, and possibly a series of emails over the next month.
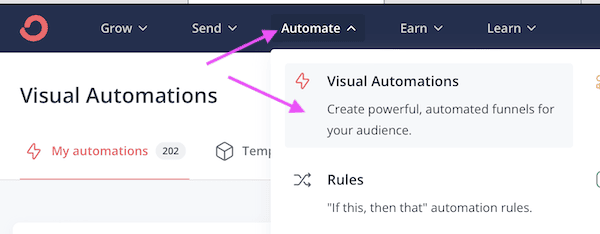
To do this, you will first need to head over to the ‘automate’ tab in ConvertKit, and follow the steps below carefully.
If you don’t have ConvertKit yet, start your free trial here.
Navigate to ‘Automate’ and then ‘Visual Automations.’
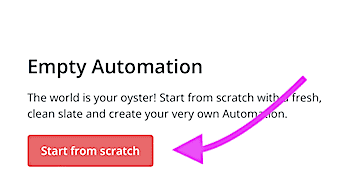
Click the button ‘Start from scratch’
On the next screen, choose ‘form’ and then ‘inline.’
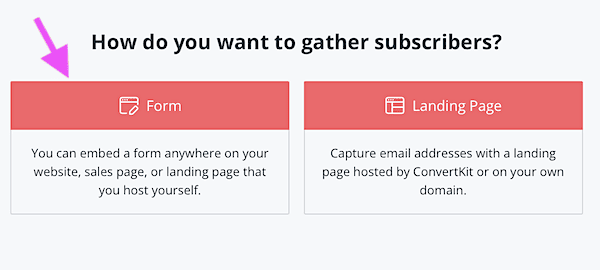
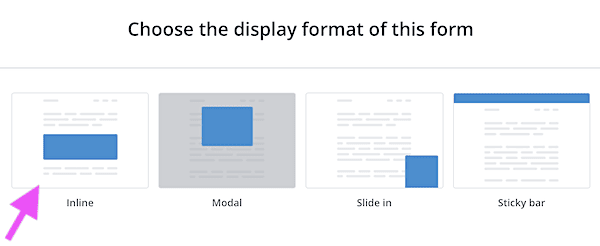
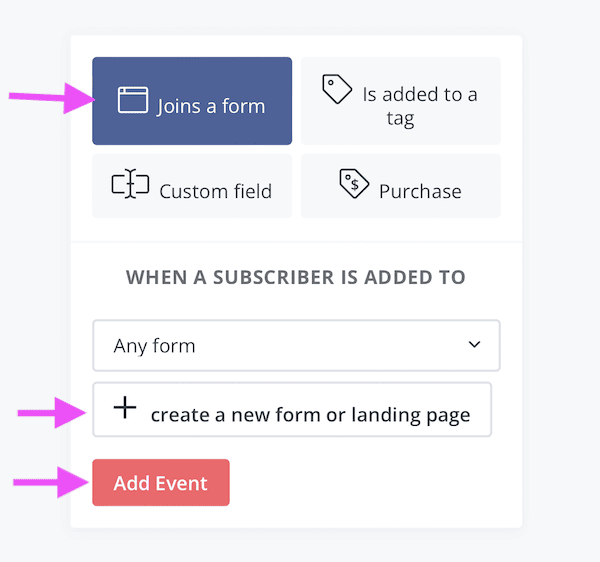
Once you’ve done that, you will land on the automation building screen. Click ‘Start building’ and then set up the first step in your automation. Aka the ‘trigger’ which will start the rest of the automation. For this example, we will choose ‘joins form’ and create a new form.
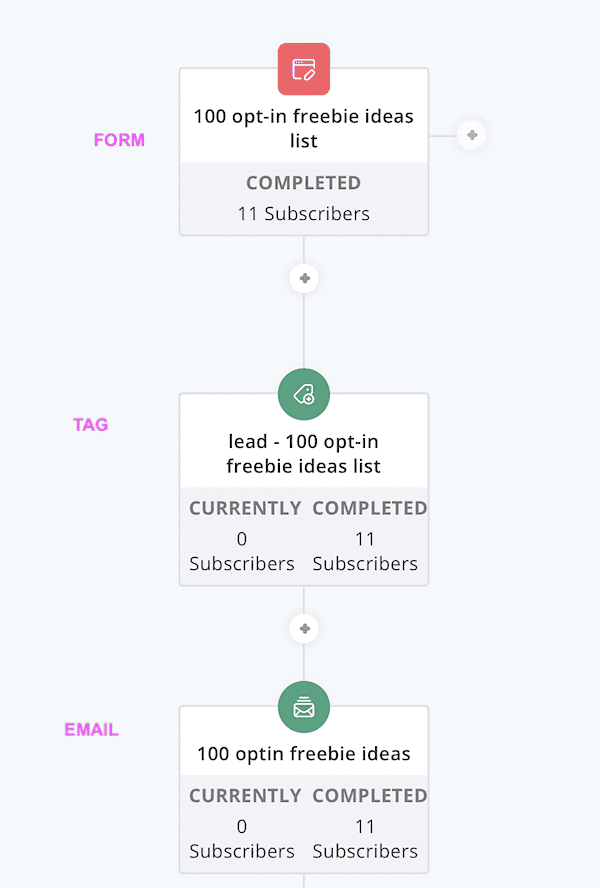
You will want to create the form, and then a tag, and then an email.
For example, when people sign up for my lead magnet ideas freebie, they go through the form, and then they are tagged as having that lead magnet, and then they receive an email.
When designing the form, in the ‘settings’ area there is a space to enter a confirmation message. You might want to include a message saying that their lead magnet is on its way to their inbox, check their spam/junk folder if they don’t see it in the next few minutes and mark your emails as “safe.”
4. Set Up The Lead Magnet Delivery Email
Finally, it’s time to create the email that they will receive, to download your lead magnet.
When designing this email make sure that you set the delivery time to 0 (so they receive it immediately after signing up) and the tab to ‘published’ so it’s active.
- Write a short email to welcome new readers –
- Introduce yourself with a quick blurb about who you are
- What you do and how you will help them (make it about them, not you)
- How often they can expect an email and the type of content
- Include the link to where they can download the lead-magnet/opt-in/freebie (ie Dropbox)
ConvertKit also gives you the option to write more emails that can be delivered later. This is called a ‘Welcome Sequence’.
If you’re stumped for ideas on what the heck to write, is an invaluable resource to help you develop your email welcome sequences.
5. Embed The Form + Start Promoting
Now that that’s done, go back to the form settings, and grab the code or URL link for the opt-in form.
TIP: You can embed the opt-in form anywhere on your site!
Stick it in your sidebar or even better add it to the bottom of your blog posts (or do both). This alone is the perfect spot to get in front of your new audience and get people onto your list.
From there you can expand and start to learn more about list building. Things you want to look into are…
- Building a dedicated landing page for your lead magnet/opt-in.
- Consider using pop-ups.
Pop-up opt-in forms are a toss-up. You’ll get a lot of opinions on pop-ups and I’m pretty sure Google was or is penalizing pop-ups on mobile because they are, well, quite annoying and get in the way.
Personally, I tend to click away as soon as one interrupts my visit to a website. With so many ways to prompt a potential sign up among the slew of ways to lure traffic to your blog, do you really need to be “in your face” about it?
But, please, do some research, test it out, and do what’s best for your blog.
6. Start publishing your newsletter!
Commit to writing and publishing your newsletter consistently. It doesn’t matter if it’s once a week, more or less, so long as you pick a schedule that works for you and stick with it.
Read this:
- 26 Newsletter Ideas – What To Send Your Email Subscribers
- How to send newsletters your subscribers will love
How To Get People To Subscribe Your Newsletter
Once you get your opt-in page set up, it’s time to promote your lead magnet opt-in page by;
- Linking to it from your social media profiles
- When you write an article for another blogger as a guest blogger
- In your blog posts
- Promote in Facebook Groups
- Add it to your navigation menu
- Sidebar of your blog and
Tell any email subscribers you acquired prior to having a lead magnet in place.
There’s a lot more to learn about list building, but this should get you started in the right direction to start your first newsletter. Once you get your first few subscribers, it’s time to start emailing them regularly.
Launching A Newsletter – Quick Start Tips
Send a quick email every time you publish a new blog post, or if you do a lot of posting, consider doing a weekly recap-type email instead.
The main idea is to keep bringing them back to your blog and turn them into your loyal fans and regular readers.
Once that happens, chances are good that they will start to share your blog, lead magnet and individual blog post links within their circle.
Since everyone has social media profiles these days, that could amount to quite a bit of new traffic for you.
Easy Steps To Start A Newsletter – Conclusion
I hope you found this guide on how to start a newsletter helpful. If you did, please share/pin it.
if you want to learn more about email marketing, monetization, and growing a digital business, join my newsletter here!
Read this next: How to monetize a newsletter.
Follow along on Instagram!


