How To Enable Rich Pins

How to enable rich pins and claim your business on Pinterest step by step tutorial.
Rich Pins. What Are They? Rich Pins are Pinterest Pins that have more information included in them, such as your avatar, your website and other details that wouldn’t appear in a regular Pin.
As an affiliate partner of various brands and sponsored content, HerPaperRoute may earn commission on qualifying purchases. Disclaimer
These added details help to improve your brand on Pinterest, make you recognizable and increase re-Pins.
A Rich Pin looks much more professional!
Here’s how to enable rich pins and claim your business on Pinterest in just a matter of minutes.
How To Enable Rich Pins And Claim Your Business On Pinterest
What Are Pinterest Rich Pins?
Pinterest says:
Rich Pins show metadata right on the Pin itself, giving Pinners a richer experience and increasing engagement. Information in a Rich Pin is independent of the Pin description, ensuring that important information is always tied to the Pin. There are 4 types of Rich Pins: app, article, product and recipe Pins.
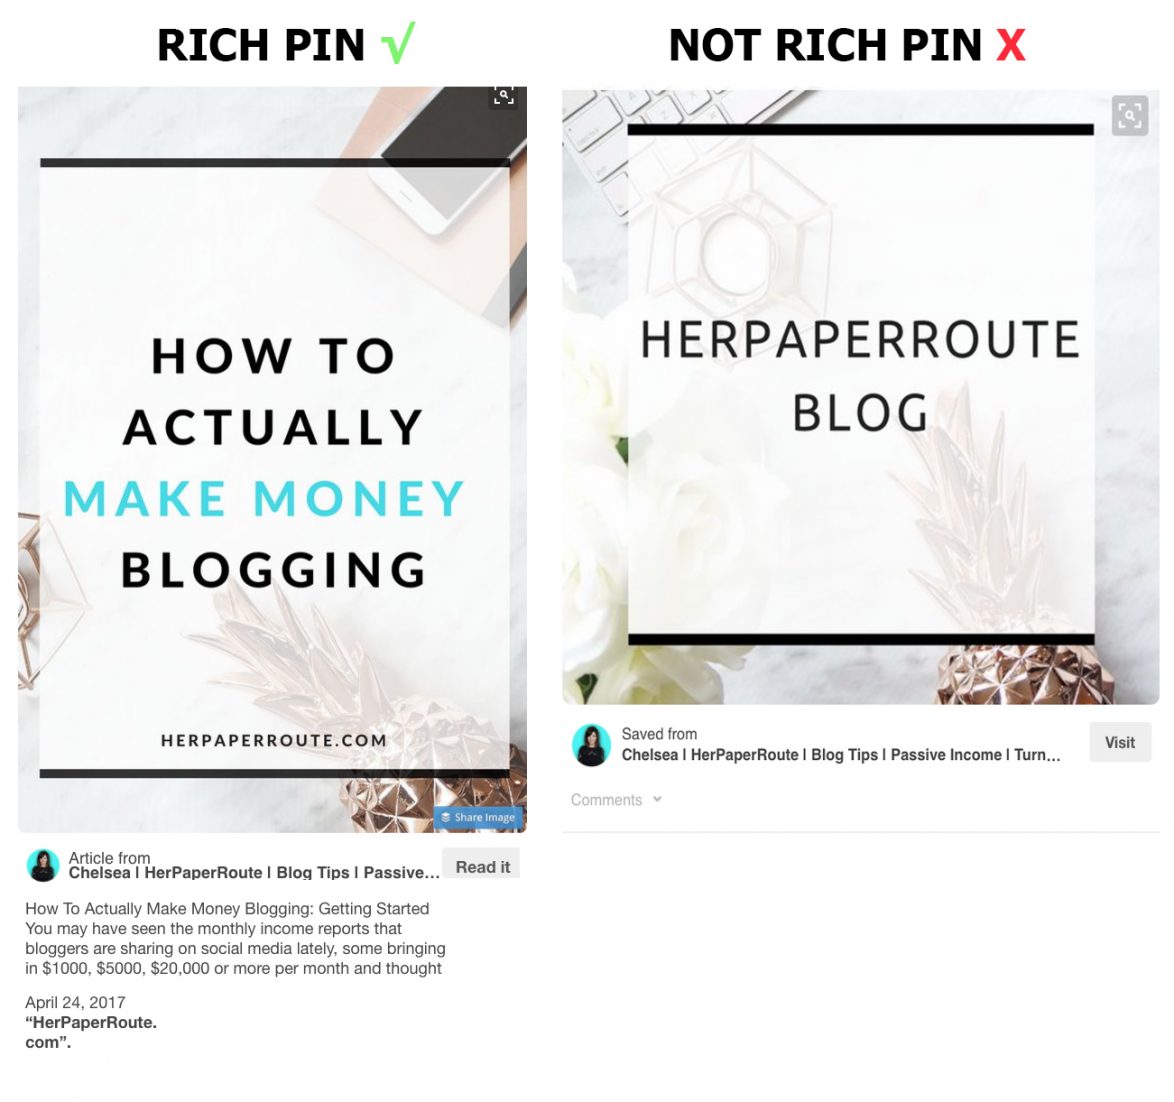
As you can see in the image above, the pin on the left has a headline and description from the article it links to, the date it was posted, and my website name.
This is the rich pin. The one on the right is a regular pin, with no information other than that I saved it.
Types Of Rich Pins
Currently, there are 4 different types of Rich Pins that are available, depending on what type of post you are pinning:
- App – Include app info and link to app store to download
- Article -Include the headline, title, story/ description, and author.
- Product -Include pricing, availability and where to buy/ link to cart.
- Recipe – Include ingredients, cooking times and serving information.
How To Enable Rich Pins

1. You Must Have A Business Account
In order to apply for Rich Pins, you will need to have a Pinterest business account. It’s free!
And you will have access to top-notch analytics records about how your pins are performing, which is a much-needed tool for anyone looking to grow their Pinterest following.
You can join as a business or switch your current account to a business one here: https://business.pinterest.com/en.
Click either ‘Join as a business’ or ‘Convert existing account.’
2. How To Verify Your Website With Pinterest
It is important that your website is verified with Pinterest.
If you need to do that, see below, or if you have already verified your website, skip to #3.
Once you have a business Pinterest account, you can verify your website. This is important in order to enable rich pins.
Note: if any of this seems confusing, I do offer the service of getting Pinterest accounts verified and enabling rich pins. You can have me do it for you at any time. More details on my Pinterest Rich Pin Install Service.
To do it yourself, read on.
How to claim your website on Pinterest:
Go to your account settings and scroll to the ‘claim’ area. Enter your website URL and click ‘Confirm website.’
A window will pop up with some code, called ‘metadata.’ You will need to add this code to your website in one of two ways:
A) Copy the code into the <head> section of the index.html file of your website before the <body> section.
Or, if you use a Genesis Framework Theme you can easily do this from your theme customizer under ‘theme settings’ and not have to touch your index.html file at all.
If you aren’t using a Genesis theme, then your next option is to use a plugin. AddFunc Header Footer is a good one.
or B) Upload an HTML file to your web server. You do this by logging into your web hosting CPanel and uploading the file to your website’s main folder. If you aren’t sure how to do that, then you should go with option A, above.
Once you have added the metadata, go back to your account settings on Pinterest and click ‘Finish.’
Related: Where To Find Pinterest Group Boards And How To Join Them
3. Apply For Rich Pins
Once you have a Pinterest Business account with a verified website, you are ready to apply for Rich Pins.
First, choose a page or blog post on your website (other than your homepage). Then copy the code below and change my sample info to info about your chosen page or blog post.
<meta property="og:type" content="article" /> <meta property="og:title" content=“PUT YOUR BLOG POST TITLE HERE” /> <meta property="og:description" content="EXPLAIN WHAT YOUR POST IS ABOUT HERE" /> <meta property="og:url" content="https://YOURWEBSITE.com/POST-URL " /> <meta property="og:site_name" content="YOURWEBSITE.com" /> <meta property="article:published_time" content="2019-01-12T00:01:56+00:00" /> <meta property="article:author" content=“YOUR NAME” /> For this example, I am applying for an Article Rich Pin. If you want a different Pin type, you will need a different code, which can be found here: App | Product | Recipe |
Once you have edited the code to information about your own website, you will paste it into the <head> section of that specific post.
Choose a page or blog post on your website (other than your homepage) and enter the following code into the <head> field.
If your website runs on the Genesis Framework, then you can simply copy the code below, change it to your info and paste it into the <head> section in the post editor.
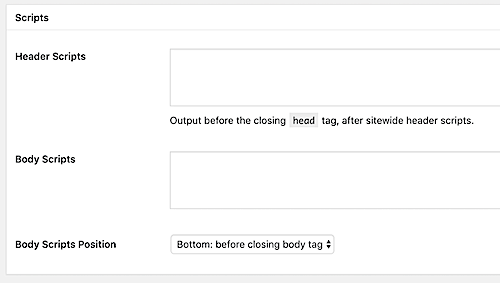
If you aren’t using a Genesis Theme, use the free AddFunc Head Footer plugin to do this step.
Again, if you are lost on any of this, I offer Pinterest rich pin install service.
4. Validate Your Rich Pins
Finally, go to the Pinterest Validator and enter the URL of the page that you put the code into.
You only need to validate 1 URL to apply for Rich Pins on your entire domain. No need to submit all of your URLs!
You will get an email from Pinterest once your Rich Pins are approved.
5. Increase Your Pinterest Reach, Use These Pinterest Apps
I use these two apps to help grow my business with Pinterest.
Tailwind
Tailwind – This amazing tool makes auto-pinning to my group boards super easy.
Plus, Tailwind Tribes will help you increase your Pinterest ranking while supporting your fellow pinners. Join my tribe here free plus get a month of Tailwind, free too!
TastyPins
TastyPins – This helpful little plugin allows you to ‘turn off’ pinning ability on specific images (images on your blog that you don’t want people to pin).
While giving you extra SEO details to add your images that you DO want pinned.
Want More? I Teach A Pinterest Marketing Course
Come and join my Pinterest Marketing Course!
Are We Following Each Other On Pinterest? We Should Be:
Check me out @HerPaperRoute and @BlogTips_
Pinterest Marketing Tips
- 4 Avoidable Pinterest Mistakes That Are Hurting Your Business
- My Traffic From Pinterest Skyrocketed Once I started Doing This
- How To Find & Join Pinterest Group Boards

Follow along on Instagram!


