78 Epic Pinterest Marketing Tips For Your Business

Today I want to share with you some excellent Pinterest marketing tips. 78 of them, actually.
Pinterest is such an amazing tool for blog traffic. Pinterest can consistently send hundreds if not thousands of visitors to your site each day. I love my visitors who come here from Pinterest!
As an affiliate partner of various brands and sponsored content, HerPaperRoute may earn commission on qualifying purchases. Disclaimer
But visitors from Pinterest don’t land here on coincidence, nope, I have crafted a strategy that helps them get here on purpose.
Want to know how?
78 Pinterest Marketing Tips – Let’s Skyrocket Your Blog Traffic!
Pinterest is one of my favorite platforms for discovering other people’s content, and getting new eyeballs on mine.
But I know it’s not the easiest tool to use when you are just getting started.
So I wanted to share some Pinterest tips for what’s been working for me right now, that anyone can dig.
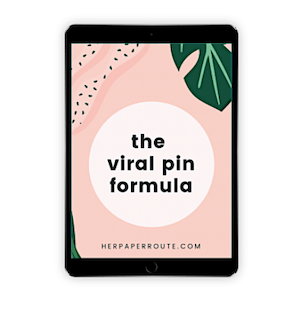
First, I want you to have a FREE copy of my Viral Pin Formula ebook which shows you how I design viral pins using free online tools.
It’s packed with many resources to help you plan your social media attack and make money blogging. Get it in the HerPaperRoute Toolkit, here!
78 Pinterest Marketing Tips That Will Grow Your Blog Traffic Like A Pro
Using these Pinterest marketing tips and SEO strategies, I 10x’d Pinterest traffic to my blog. I managed to ‘crack’ the Pinterest algorithm and get all up in the smart feed.
So I’m pumped to share my Pinterest marketing strategy with you.
Hopefully, you’ll be able to up your Pinterest prowess and ultimately increase your blog traffic too!
You may have zero clue how to use Pinterest for your business. And that’s ok Because today that will change.
Here’s the secret, my friends: When used correctly, Pinterest is a game-changer.
What I love most about Pinterest is that there’s no limit or cap on your growth.
The same pin can be re-pinned hundreds or thousands of times over a span of months or years. It’s not like, say, Twitter, where maybe 20% of your followers actually see your tweet before it gets buried in the feed.
Because Pinterest encourages so much click-through traffic, it’s also one of the best tools for promoting your products, courses, and services.
Think of all the different things you can share to Pinterest that will lead people toward your paid offerings…
- Your blog posts, where you promote your products or services
- Your opt-in freebies, with go into sales funnels for your paid offerings
- Images that lead directly to the sales pages for your products and services
- You can even use affiliate links on Pinterest to drum up some passive income.
Yep, Pinterest is an amazing platform. I truly believe it’s the #1 platform you need to invest time into if you want to see continued (and exponential) growth of your traffic and sales.
However, I also know that Pinterest can be just a wee bit confusing at first.
If right now you’re thinking, “I have no fricken’ clue what to do here. HELP!”
…I’ve got you!
Over the past few years, I’ve done a ton of research, tested a bunch of different strategies, and finally found what works.
To let you in on all my secrets and strategies, I created this list of 70+ epic ways to grow your Pinterest account, traffic, and sales.
Put these tips into action a.s.a.p. to start seeing quick results!
To make this massive pile of tips easier to digest (trust me, there’s a lot to cover!), I’ve split the tips up into 6 categories like so:
- Prime your profile
- Create SEO-Optimized boards
- Pin the perfect images
- Optimize Your Website for Pinterest
- Develop a pinning strategy
- Gain more followers & traffic
- Develop a Winning Pinning Strategy
- Gain Followers + Get More Traffic
In today’s post, we’ll talk about how to maximize your Pinterest profile, create the perfect boards, and fill those boards with high-quality content. Ready?
1. Utilize Keywords
The first thing to keep in mind is that Pinterest is a search engine, much like Google. What this means is it is SUPER important to set up your images with strong SEO keywords.
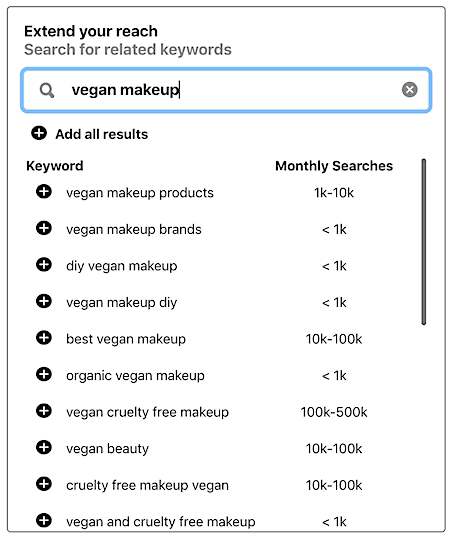
You can use the Pinterest ads tool to see stats of how many people are searching for things, by keyword each month.
Make a list of the high-search volume keywords that make sense for your pin/blog post /brand. Then be sure to include them:
- In your Pinterest account description
- your board descriptions
- board names
- and your pin descriptions
2. Clicks Matter Most
It’s nice if your pin gets a ton of impressions, but unless people are clicking and visiting your blog post, it’s irrelevant. You should aim to make click-worthy pins from the start, and regularly check in on your Pinterest analytics to see which pins people are clicking.
See: How to create click-worthy, viral pins.
Another irrelevant metric is the ‘monthly views’ number that appears on your profile. That isn’t an accurate measure of your strategy or profile performance, as that number has nothing to do with clicks.
3. Get Active In Group Boards
Join Pinterest group boards that fit your niche, and pin to them regularly. See How To Find Pinterest Group Boards for a more in-depth explanation on this.
4. Pin Smart
Pinterest has confirmed that they prioritize fresh content (new pins) and that resharing old pins is bad for your account.
As Ive shared with you before, repinning old pins is one big reason why accounts get blocked for spam.
What does this mean for you?
– Create new pins each day (3 is great if you can) and yes, create new pins for old blog posts
-Make your pins look different from one another
-Pin 5-10 pins on the same topic/niche in a session. Don’t pin a bunch of random pins about different topics in one session. What you pin in 10 minutes time can be grouped together in search results
– Always create unique descriptions every time you do repin the same pin again
– Stop repinning your old pins over and over
– If looping your pins has been working for you, great. I wouldn’t say stop looping IF its been working for you
– BUT I don’t recommend you START looping now if you aren’t already. Looping is essentially resharing played-out old pins, so not worth it in my opinion.
– Tailwind has made some changes to SmartLoop to try to work around this. They have now released a tool called SmartGuide which keeps you up to date on Pinterest’s best practices, and alerts you if you are nearing spammer territory.
What Does SmartGuide Do?
– Monitors your pinning and alerts you if what you’re doing might reduce your overall reach or put your account at unnecessary risk
– Suggests easy fixes to maintain a healthy queue of scheduled Pins
SmartGuide will be rolling out in waves in the coming weeks.
Tailwind members who have SmartGuide enabled and are publishing a healthy volume of Pins will see an “All Clear” badge, as in the screenshot below.
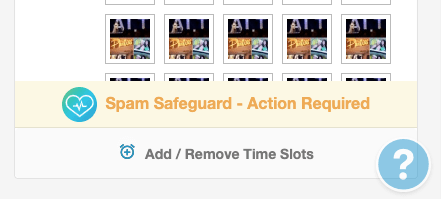
If SmartGuide detects potentially risky behavior that might reduce your distribution, it will tell you, so that you can make adjustments before publishing.
5. Use A Business Account
It’s free! Having a business account as opposed to a personal account gives you more features and analytics. Here’s how to get a Pinterest business account.
6. Claim Your Website On Pinterest
When you claim your website, any image that is pinned from your URL will show your profile info. Here’s how to claim your website on Pinterest.
7. Get Rich Pin Certification
You must have a Pinterest business account, and be approved for Rich Pins. It’s free. I have a guide on how to set up Rich Pins here. Read that first if you aren’t already set up for that.
8. Pinterest SEO – An Easy Image Seo Trick #1
This little trick is a simple and quick way to add keywords to your pins, so that they show up high in search results. SEO can be confusing, but this is an easy way to implement strong SEO to your images/website without a headache.
First, go to your image library in WordPress ( Media / Library) and click the image you intend to pin on Pinterest.
Alt tags are read by Google and other search engines to determine what an image is about. It’s best to include keywords here that describe the image itself, but you can also include keywords that you want the article to rank for.
To do that, enter your info in the ‘Alternative Text’ space. Make sure the title of your image has keyword as well.
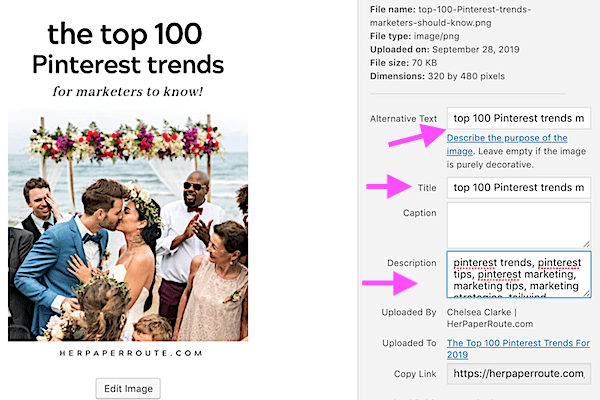
Then you will see that in the Description area, I’ve put a whole bunch of words. These are more keywords. These keywords are anything that someone might type into Pinterest or Google when looking for what my Pin is about.
9. Pinterest SEO – An Easy Image Seo Trick #2
Now here’s the fun part. Optimizing your images for Pinterest part two! For this step, you will need to have the TastyPins plugin. This plugin gives you additional SEO features for Pinterest marketing.
With TastyPins installed (or Hubbub) you can now fill in a pin description, that Pinterest will pull and display whenever this image is pinned from your site.
Once you have pinned an image the first time, Pinterest will assign it a pin ID. You will use this so that when someone pins this image again, it creates a repin for it, instead of creating an all-new pin each time.
You get this id from the URL of the pin. Example:

You would simply copy the numbers in the URL of your pin and paste it into the Pin Repin ID area.

TastyPins also gives you the ability to disable pinning if you didn’t want someone to pin an image. This is very handy for banners and ads that you’ve linked out to affiliate products.
10. Make Your Website Primed For Pinterest
Have social share buttons as well as a pin it button. Social Warfare provides you with both. Place them where your site visitors can’t miss them. Don’t make them look for a Pinterest button, make it obvious.
11. Don’t bog down your website with huge pins
The standard pin size is 1000x1500px, but you don’t need to upload such large images to your website. Instead, when you make a pin, do this:
- Upload the 1000x1500px image directly to Pinterest first, then get the pin ID (tip #9).
- Then, resize the image file on your computer to something much smaller, and upload THAT image to your website.
- Place the pin ID from the 1000x1500px version into the smaller image’s TastyPins Pin ID box.
- Voila, when the small image on your website is pinned, it actually repins the large image, hosted on Pinterest.
12. Pin Affiliate Links
Yes, Pinterest allows affiliate links. You can earn affiliate commissions from pins that get clicked years after you’ve pinned them, so let em rip!
13. Keep Tabs On What People Are Pinning From Your Site
Go to https://pinterest.com/source/YOURWEBSITE.com/ to see what people have been pinning from your website. Just change ‘YOURWEBSITE.com’ to your actual URL.
14. Monitor Your Google Analytics
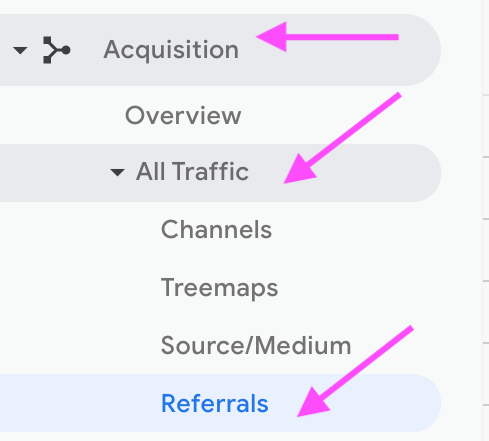
You can find your Pinterest traffic stats under Acquisition – All Traffic – Referrals. From there you will be able to see individual pin stats.
15. Make Some Boards That Are Named The Same As Your Blog Categories
This just saves time later, trust me.
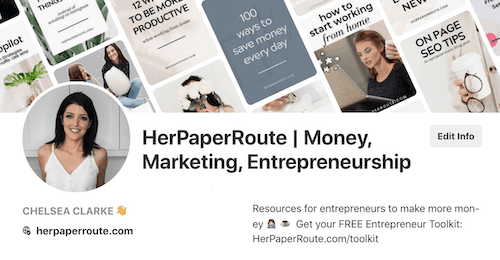
16. Put KeyWords in Your Profile Name
This helps your profile show up in search results when people search for what you do.
17. Utilize Your Description
You only have a few characters. Mention what you do and who you help in your description. If there’s space, drop a link to your freebie. It won’t be clickable, but people know how to enter a link into an address bar nowadays.
18. Include Your Website In Your Profile
See Pinterest Marketing tip #6 about claiming your website.
19. Put Something Other Than Your Location Under ‘Location’
If you are an online entrepreneur, where you live physically doesn’t really matter. Consider adding some other information in the ‘Location’ space on your Pinterest Profile. Since I use ‘HerPaperRoute’ my business name as my profile name, I’ve used the location space to add my real name.
20. Avoid Common Pinterest Mistakes
There are some rookie mistakes that can really mess you up. Read up on the 4 Avoidable Pinterest Mistakes That Can Hurt Your Business.
21. Connect With Other Bloggers
Follow other bloggers and repin some of their pins. If you’d like to connect with me, you can find me at @HerPaperRoute. I share lots of blogging, affiliate marketing and Pinterest marketing tips there.
22. Use Hashtags
Hashtags are searchable and clickable. Use them. But not just any keywords – make sure you use targeted, keyword hashtags on Pinterest.
23. Pin Your Sales Pages
Pinning your blog posts is essential, but don’t forget to pin directly to your sales pages and opt-in freebie landing pages too.
24. Promote Pins
Promoting a pin as a PPC ad is the fastest way to get your pin seen by the masses. Do you have an awesome new blog post? Promote a pin to it. Simple.
25. Bid On 20-30 Keywords In A Promoted Pin Campaign
20-30 is a Pinterest marketing tip that Pinterest recommends as a good guideline for how many keywords you should bid on when running a promoted pin campaign.
26. Manually Pin
Manually pin a bit each day. By that I just mean log into the Pinterest app, repin some pins that interest you, and manually pin your blog posts. Basically, just be present on Pinterest as a human.
27. Use Tailwind
You can use Tailwind to schedule pins to your group boards. This with some daily manual pinning is something that can really boost your reach quite quickly.
Simply connect your Pinterest account, and you will be given a multitude of powerful tools from your Tailwind dashboard, including showing you which of your pins and boards are doing the best and worst, and a fully visual overview of your scheduling efforts.
Sign up for a new account on Tailwind: This link gives you a free month.
78 Pinterest Marketing Tips - How to use #Pinterest for business and beyond!28. Use Tailwind Tribes
Tailwind Tribes (now known as Tailwind Communities) is a previously invite-only app that is the secret ingredient of bloggers and influencers to majorly boost blog and Pinterest traffic, engagement and social reach.
If you have been a reader of this blog for a while then you already know how I am a huge supporter of Tailwind Tribes!
You may even be in the HerPaperRoute Tailwind Tribe, which has helped hundreds of bloggers like you bring in major amounts of traffic from Pinterest. Come join the HerPaperRoute tribe here and get a $15 Tailwind credit too!
For a step-by-step guide to using Tailwind Tribes, read this: How To Use Tailwind Tribes
How I Use Tailwind To Automate My Pinterest Marketing
In the video above, I share my Pinterest marketing tips for growing your blog with the strategic use of Tailwind and Pinterest as a marketing tool.
Click to watch this over-the-shoulder demo of how I use Tailwind to automate my pinning efforts.
29. Create A Gift Guide Or Top Recommendations Board
Fill this board with affiliate products, obviously! Learn about affiliate marketing.
30. Niche Boards Are Queen
When you have a new blog post / new pin, make sure that you pin it to one of your niche boards first, a board with lots of keywords that is on-topic for what this new pin/blog post is about.
Don’t post it to your ‘best of ‘ board or any ‘catch all’ board on the first day. You need to give the first pin its keyword juice, to signal to Pinterest so it knows how to show it in search results.
31. Use Pin Templates
If you aren’t super design-savvy yourself, get these Pin Templates which make it super easy to create pins.

32. Take The Pinterest Marketing Course
We cover exactly how to grow your blog and business by strategically using Pinterest as a marketing tool.
You’ll learn how to optimize your website for Pinterest sharing, develop an effective pinning strategy that won’t take up hours every day, and then translate your Pinterest followers and re-pins into actual traffic.
33. Perfect your profile
People often overlook their Pinterest profile but it’s an awesome way to market yourself, your business, and your brand. It puts a recognizable face to your business, humanizes your brand, and also allows people to head straight to your website. Here’s how to make the most of your Pinterest profile…
34. Have an awesome profile picture
Use a clear, branded photo of yourself as your profile picture. You’ll want a square image, and remember that it will be cropped into a circle once you upload it to Pinterest.
It’s best to use the same photo that you’ve used on all your other social media accounts and on your website so your audience can recognize you easily (consistency is key!).
35. Use niche-relevant keywords in your Business Name
For example, instead of just writing “Chelsea” in my name on Pinterest, I might add “Business Mentor” or “Content Marketing”.
P.S. In order to use a Business Name, you’ll need to switch over to a Pinterest Business Account.
36. Include niche-relevant keywords in your bio
The exact same thing goes for your bio.
37. Add a call-to-action and URL at the end of your bio
Choose a freebie that you want to drive traffic to and then include a short and sweet call to action and a shortened URL at the end of your Pinterest bio.
You can use bit.ly to create the shortened link.
Note that links in your bio won’t be “clickable”, but people can always copy and paste the link into a new browser tab to access the freebie.
38. Verify your website.
In order to access all three sections of Pinterest Analytics and see your website’s click-through traffic from Pinterest, you’ll need to verify your website. Follow this step-by-step guide to verify your website.
39. Create SEO-Optimized boards
Boards are make-it-or-break-it on Pinterest. Pinners have the option to follow your individual boards or your whole account, so you need to make sure each boards count! Use the six tips below to create the perfect boards for your audience and brand.
40. Curate the perfect mix of boards
You’ll want a minimum of 10 boards to start with, with at least 30 pins on each. Pinterest will let you go up to 500 boards (!!) but I recommend staying under 50.
You don’t want to overwhelm people, or yourself.
When creating boards, always think of what your ideal reader is searching for. Remember: your boards are not for you, your boards are for your readers.
For example, my readers are looking for content tips, copywriting tips, and business tips. And low and behold, you’ll find a board dedicated to each of those topics on my Pinterest account!
If you have boards that don’t fit well with your ideal audience and their interests, keep them as “secret” boards on your account for your own personal use.
You can also add in some slightly off-niche boards to spice things up a bit, if you like.
Now, I’m not saying to go create a board of cat memes if that’s not something your ideal reader is interested in.
But if your audience is, say, beauty bloggers, they’ll probably also appreciate home decor inspiration, travel inspo, or motivational quotes. Use your common sense with this one!
41. Categorize your boards
This is an often overlooked step but one that’s super important for getting your boards found on Pinterest. Every time you create a new board, there’s an option called “Category” with a drop-down box of categories for you to choose from.
You might not find the perfect fit for each and every board, but try to pick the option that makes the most sense from what’s available.
42. Use keywords in your board titles + descriptions
Again with the keywords, I know! But they’re so, so important for getting found on Pinterest.
If you’re not sure what to name your boards, think of phrases your ideal reader would be searching for.
Don’t forget to put relevant keywords in your board descriptions as well.
Write a 2-3 sentence description that describes exactly what the board and pins are about, and then include a call to action encouraging people to follow that board for regular (and amazing!) content.
43. Use branded images for your board covers
You have two options when it comes to “branding” your board covers on Pinterest:
a) Choose an existing pin for the cover image that fits with your brand’s style
b) Create your own covers using your design program of choice
To select a cover image from the existing pins on the pins, simply click into a board from your profile and click “Edit Board”.
Where it says “Cover”, press “Change”. Flip through all the images on that board and select the one that goes best with your brand’s fonts, colors, and style (choose one of your own pins for a perfect fit).
Once you’ve chosen the perfect cover, hit “Save” in the bottom right corner, and you’re set!
To create your own covers like this, Canva is where it’s at. On the Canva homepage, click “Use Custom Dimensions” in the top right corner and enter 300px by 300px.
Next, use any of the shapes, patterns, fonts, and colors on the left-hand side to create a beautiful branded image for your board cover.
Once you’ve downloaded that first image, it’s as easy as changing the background color and text to fit the next board on your list.
Do this over and over again, saving each image as you go, and you’ll have a set of custom board covers in no time. All that’s left to do is upload them to Pinterest, pin them to the correct board, and then use the same steps from above to set those images as the board covers.
44. Have a board dedicated solely to your own content
Pinterest is an amazing wealth of information, and yes, pinning other people’s content is great. But the whole point of creating a Pinterest account for your business is to generate traffic for your own site, right?
This is why you need to make it easy for people to find your content by having an entire board that’s dedicated to your own content, freebies, and products.
For bonus points, place this board right at the top of your profile.
To move boards around, simply click on a board, hold your mouse down, drag, and release.
45. Put your best boards at the top of your profile
Place your eight most full and relevant boards right at the top of your profile so they’re the boards most immediately visible when someone lands on your profile.
Make sure the board you’ve created for your own content is in the top row, and then place your most helpful, fullest, most on-brand boards next to it.
46. Pin the perfect images
Pins are what make the Pinterest world go ’round. After your profile and boards are set up, you’ll want to focus on filling your boards with the best pins possible.
47. Create custom templates for your original pins
Canva is a great free tool for creating your pin templates. Why? Because every time you create a new image, Canva automatically saves a template you can go back into and edit any time (even weeks later!).
This means that all of your Pinterest graphics will have a similar look and feel to them.
When you use your brand’s fonts and colors in every image, your pins, website, and brand are going to start getting recognized on Pinterest in no time. Remember what I said earlier — consistency is key!
48. Optimize your pin size
The “perfect pin” is around 1000 by 1500 in dimension.
You should always, always use vertical images, because they take up more space on a Pinterest feed and are more likely to catch someone’s eye.
I personally recommend going even longer than 1500px, especially if you’ve created an awesome infographic.
Just be careful not to overdo it, or people will have to scroll back up a long way in order to re-pin your image as the pin button is in the top right corner (and they might just say “no thanks” instead).
49. create & pin images with a text overlay
Pins with text overlay are way more likely to be re-pinned than those without.
The text in the description box under the image is pretty teeny tiny (and in some cases, doesn’t show up at all), so a great pin makes it clear what the blog post is about by having a large, clear headline on the image.
Text to add to your Pinterest graphics includes:
- a) The blog post title
- b) An intriguing sub-heading
- c) Your website name and/or URL
50. Use keyword-rich pin descriptions
Sensing a trend here? If you’re not sure what keywords to use in your pin descriptions, try entering the main topic of your post into the search bar at the top of Pinterest.
For example, for this post you’re reading, I might search “Pinterest tips”. Once you hit enter, you’ll see a bunch of other related terms pop up underneath.
These words and phrases are the most common terms people also search for when they search for “Pinterest tips” on Pinterest.
So if any of those phrases fit with the pin you’re sharing, work them into your pin description to bump up the SEO juice.
For more info about Pinterest keywords and SEO, check out my post on the 6 best places to use keywords on Pinterest.
51. Only re-pin high-quality, super valuable content
The best way to get your content to show up in other people’s home feeds is to pin top-notch, high-quality content. Here are the 4 criteria of an awesome pin and one that’s worth re-pinning to your own boards:
52. The link in the pin works properly
Meaning it goes back to the original source and not to a different site.
53. The content is useful and relevant to your ideal readers
As I said before, you’re pinning for your readers, not for yourself. Always have your ideal reader in mind when deciding whether to re-pin something or not.
54. Check the orientation
The image is vertical, the size is on point (around a 2:3 ratio), and it has large, legible text on it.
55. Create two different pins for each of your blog posts
This is a step I love doing, and I recommend that everyone gives it a shot at least once.
Instead of creating one pinnable image for each blog post, create two (or even three!) that are slightly different but just as awesome.
Try switching up the colors, fonts, wording, or the image, as long everything is still “on brand”.
Next, upload all of your pins to Pinterest and pin them to as many boards as possible.
You might be surprised to see that one image gets a lot more attention, re-pins, and click-throughs than the others!
Either way, with this strategy you’re giving yourself double the chance of having a pin go viral, and doubling the chance of someone seeing your pin and clicking over to your site.
Get A Free Copy Of My Viral Pin Formula eBook:
Become a HerPaperRoute member and I will send you a free copy of my Viral Pin Formula eBook, plus a toolkit of resources to help your blog and business thrive!
56. Add a Pin It button on your images
Let’s be real, people are lazy with a capital L.
That’s why you need to make it as easy as humanly possible for your audience to find and follow your Pinterest account, and (hopefully!) share your content to their own Pinterest accounts.
Here’s how to optimize your website for Pinterest sharing,
If you use WordPress, my absolute favorite way to do this is with the JQuery Pin It Button for Images plugin. This plugin is really customizable and super easy to use. It has tons of different settings to choose from, including:
- Uploading a custom Pin It button that matches your website’s branding
- Choosing where you want the button to show up on the image (top left, bottom right)
- Disabling the button for specific blog posts, pages, tags, or image sizes
It’s seriously the best Pinterest plug-in out there. Trust me.
57. Add Pinterest Share buttons to your content
When it comes to social media sharing, Social Warfare is where it’s at.
Social Warfare gives your readers the option to share any of your blog posts to social media with the click of a button.
I love that you can customize the buttons to match the colors of your website, so they mesh seamlessly with your branding and visuals.
58. Add Pinterest Follow Buttons in multiple places
There are plenty of great WordPress plugins for adding social media follow buttons to your site.
Places you can add your follow buttons include:
- The end of your blog posts
- The top navigation
- Your sidebar
- Your footer
59. Include 1 or more pinnable images in every post
Not sure what makes an image “pinnable”?
Basically, vertical images are a must for Pinterest — so make sure every single one of your blog posts has a long, vertical image with text overlay on it.
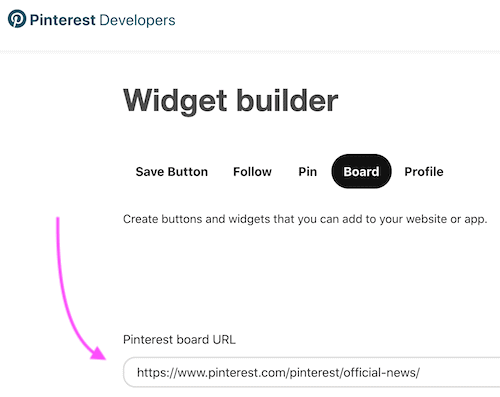
60. Embed your account and/or boards on your website
Adding one of your most popular boards into your blog’s sidebar or within your blog posts is a great way to draw attention to your Pinterest account and encourage people to check it out.
There are WordPress plug-ins that can do this for you, but it’s probably simpler than you think to embed your boards manually.
Simply go to the official Pinterest widget builder and copy and paste the code.

Develop a winning pinning strategy
Once you have a strong foundation in place, it’s time to start creating your strategy for Pinterest success.
This section’s a big one because I have lots of awesome tips to share with you! Ready?
61. Sign up for a Pinterest For Business account
With a Business account on Pinterest, you can access Pinterest Analytics so you’re able to see which of your pins are performing well (i.e., which ones are getting lots of views, re-pins, etc.), which ones aren’t doing so well, and much more.
As I mentioned above, a Business account also allows you to use a “Business Name” (your name + your brand name) on your profile, instead of just your personal name.
This makes it easier for your readers to find and recognize you.
It’s completely free to switch over from a personal account to a business account if you’re using it for your business. Click here to make the switch today!
62. Enable Rich Pins
Once you have a Business account set up, you can enable “Rich Pins” for your website.
A rich pin will have extra information added to it versus a standard pin, helping it stand out more in the feed.
63. Join relevant group boards
Group boards are one of the easiest and fastest ways to get your pins and content “found” on Pinterest.
Try to find group boards that:
- Appeal to and are followed by your ideal audience
- Have a high number of followers
- Have a high level of engagement and re-pins
Start off by joining at least 5 group boards, and then pin your content regularly to each. Make sure to spread the love and re-pin other people’s pins on the group boards as well!
From there, aim to join at least 3 new group boards every month.
To learn more about group boards, how to find and join them, and what to pin to them, check out my group board series: How to Grow Your Traffic Exponentially With Pinterest Group Boards.
64. Use a scheduling tool
The key to quickly building up a following on Pinterest is to be pinning all.the.freakin.time. If possible, up to 40-50 pins per day. Of those pins, 50% can be content from your own website, but at least 50% should be other people’s content.
If 40-50 pins a day sounds like a lot of work, there are some great scheduling tools that can help lighten the load. Tailwind is my absolute favorite.
Tailwind makes it easy to spread your pins out throughout the day, and to pin the same image to multiple boards.
It will even schedule your pins to go out at optimal times throughout the day.
65. Re-pin your own pins regularly
It’s perfectly fine to re-pin your own original pins on a regular basis, as long as you don’t go overboard with it.
- I also don’t re-pin ALL of my own pins — just the ones that fit well on multiple boards.
- I also re-pin my pins to various group boards I belong to.
Doing so increases your re-pin count, which boosts your Pinterest account in the algorithm and means you’re more likely to show up in other people’s home feeds.
So don’t be shy and feel like you can only share each pin once. The more shares, the merrier!
66. Install a Pinterest Button for your browser
Ever come across a super awesome blog post that you can’t wait to share, but when you go to pin it, the blogger doesn’t have a Pin-It button installed on their site? So. Dang. Frustrating. Right?
As if you’re going to take the time to save an image from their blog and then manually upload it to your Pinterest account, add in the link and write a description, etc. No thanks!
Help those other bloggers out by installing a Pin-It button for your browser. There are extensions for everything from Chrome to Safari to Firefox and more.
Once your extension is installed, a tiny Pinterest button will show up on top of every image you see online.
With the click of a button, you can pin absolutely anything and everything straight to your Pinterest account.
67. Create a secret “Pin Later” board
On my own Pinterest account, I have a secret board called “Private” where I pin anything that needs a little more TLC before I can pin it elsewhere.
Whether it’s a blog post I didn’t get a chance to fully read, a description that needs tweaking or filling in, or links/facts that need to be checked.
A few times a week, I go back into that board, make updates as necessary, and then pin those posts to my public boards.
I find this technique especially helpful if you use Pinterest on your phone a lot — because updating pin descriptions is pretty hard on a teeny tiny iPhone screen!
68. Bring your own content to the top of your boards
Your main goal with your Pinterest account is to promote your own business and content.
Don’t let your epic posts be washed away by all the other pins you’ve been sharing to build up your account and your following!
It’s actually pretty easy to bring certain pins back to the top of a board again. When you’re on the board, click the little icon on the top left of the board that has four arrows.
Select all the pins that lead back to your website and content, and then click “Move” again in the top left.
Then simply “move” those pins back to the exact same board.
And voila: they’re now right at the top again (back where they belong! 😉).
69. Do a monthly Pinterest audit
This is something I recommend doing for every single aspect of your business, not just for Pinterest.
At the end of every month, spend an hour or so analyzing what’s working and what’s not working, and then tweak your strategies as needed.
Are you spending enough/not enough/too much time on Pinterest? Can you speed up your pinning process?
Is your scheduler working to the best of its ability? Are there better times of the day you could be pinning at?
Next, take a look at your pins. Are any of the descriptions uninteresting or outdated? Are all of the links still working properly? Fix anything that needs fixing.
You could do this during your monthly CEO Day.
70. Set goals and track your performance
Setting goals at the beginning of each month will help motivate you to continue growing your Pinterest account.
Choose specific goals for how many new followers you’d like to gain that month, how many pins you want to be shared from your website, and so on.
Then make a plan to achieve those goals!
At the end of the month when you’re doing your audit, make note of whether you achieved those goals or not, and how you can improve your strategies for the upcoming month.
71. Use the Smart Search to your advantage
I absolutely love the “Smart Search” bar at the top of Pinterest. Finding the perfect SEO keywords to use on your account has never been so easy.
Finding people to follow and interact with has never been so easy.
You can use the Smart bar to find keywords for everything from your profile descriptions, pin descriptions, board info and titles, and basically anything else you can think of.
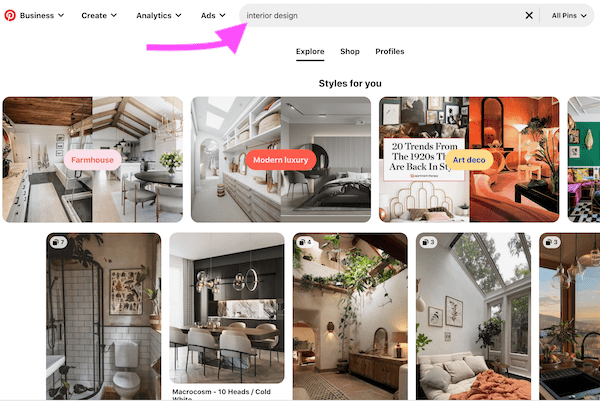
Just type a search term into the bar, press enter, and other related and commonly-searched for keywords will pop up underneath.
Gain followers & traffic
By this point, you should be well on your way to Pinterest success!
But there are still a few more things we can do to grow your Pinterest following and send more traffic to your website, freebies, and offerings…
72. Follow + connect with other pinners
Every so often, make a point to follow and reach out to:
a) Peers in your niche (e.g., other entrepreneurs)
b) Your ideal readers (people interested in the topics you teach about)
Again, the Smart bar is the perfect way to find these people.
Type in some descriptive words about the people you’re trying to find (“food blogger”, “business coach”), hit enter, and then select “People” to filter out everything else.
Another easy way to find your ideal readers is to head over to a popular Pinterest account in your niche (for example, if you’re a yoga instructor, check out Lululemon’s account), and look at their list of followers.
Chances are, those people love yoga, so they’re gonna love your business too! Follow these people, like and re-pin their stuff, and leave genuine comments on their pins.
73. Be social
When it comes to Pinterest, people often forget to be social. Going out of your way to like and comment on someone’s pin can go a really long way.
Because comments are so rare and unexpected on Pinterest, they make a really great impression.
Try commenting with something simple and sweet about the post or pin, and 90% of the time that pinner will be heading over to check out your Pinterest account and business when they see your comment.
74. Say thanks when people pin from your site
A quick, “Thanks for sharing this for me, I’m so glad you liked it!” will do wonders — and you’ve probably just gone from one simple re-pin to a new follower in 5 seconds!
75. Cross-promote on your other social media accounts
Chances are, the majority of your Twitter followers also use Pinterest, so make an effort to send out a few tweets each week linking to your Pinterest account.
Include a call to action and tell people exactly why they should follow you (e.g., “for more epic cooking tips!”).
Do this regularly on your Instagram, Facebook, and any other social media platforms you use.
76. Join a Pinterest promotion group on Facebook
One of the biggest things I’ve learned over the 3+ years I’ve been an entrepreneur is that biz babes are some of the friendliest, most helpful people in the world.
To prove my point: Entrepreneurs have created Facebook groups with the sole purpose of sharing and promoting other people’s content on Pinterest. (mind. blown.)
Find some promo groups or threads to join on Facebook, and share your stuff in there regularly.
Tailwind also has a feature called “Communities” that works in a similar way!
77. Tag the content creator in your pins
Did you know that you can “tag” people on Pinterest? All you have to do is use the @ sign before their Pinterest username.
If possible, try to tag the person who wrote the blog post whenever you’re pinning it from their site or re-pinning it.
That person will get notified, be super appreciative of your re-pin, and be more likely to follow you, check out your content, and share your pins in return!
78. Create your own group board
Who says joining other people’s group boards is the only way to make it big on Pinterest?
Go ahead and create your own group board! Invite the best pinners to join your group, and be sure to set specific rules for what and when they can pin to the board.
Creating your own group board is a great way to get your pins out there. And, bonus — you can make it a rule that in order to join the board, every pinner has to be following you first!
It’s an easy, non-sleazy-looking way to build your follower count quickly.
78 Epic Pinterest Marketing Tips For Your Business – Conclusion
We made it to the end of this epic guide packed with the best Pinterest marketing tips!
Kudos to you if you stuck with me. Hopefully, you learned a thing or two, and found some epic strategies to use on your Pinterest account.
Did you love this post of Pinterest marketing tips? What was your favorite tip in this series? Do you have any other tips for Pinterest success? Let me know down below!
Also, I’d really appreciate it if you pinned it!
Follow along on Instagram!


