How To Write A Roundup Blog Post To Skyrocket Your Traffic

If you are looking for some tips on how to write a roundup blog post and use it to grow your blog traffic like wild, look no further.
This guide to writing high-converting roundup posts covers everything you need to know to make yours a success.
As an affiliate partner of various brands and sponsored content, HerPaperRoute may earn commission on qualifying purchases. Disclaimer
From how to find bloggers to feature in your roundup, to SEO and promotion tricks, and how to do it all without infringing on copyrights.
Here are some effective tips you can use today, to write an amazing roundup blog post that can skyrocket your traffic overnight.
How To Write An Amazing Roundup Post To Skyrocket Your Traffic
Roundup blog posts can be great for a number of reasons.
One, they help fill up your content by including tips from other bloggers, and two, those other bloggers usually share your post with their networks. This can help your blog traffic a lot!
As I’m sure you are aware, blogging is hard work. Really hard work.
No matter how much work you do, it can often feels that your to-do list grows exponentially faster than your finished list.
Meanwhile, we are all wishing our business would grow faster than it is.
Figuring out how to work smarter, not harder, is the only way I find I can keep on trucking when it all feels overwhelming.
Building up our skills and working more efficiently makes it possible to cross one more thing off of that list. It’s even better when you can find a way to accomplish multiple goals at once, which is the real secret sauce in this tutorial.
Leverage, baby, leverage.
In one shot, we’re going to:
- Reach a (way) bigger audience
- Get more shares of our content
- Provide value to our audience
- Build our blogging network (yay friends!)
- Fill our social media schedulers to the brim
- Earn more money from our websites
- Occasionally garner a backlink to our sites
This tutorial is going to show you how to work smarter not harder when it comes to writing roundup blog posts.
There are two types of roundup posts: one is an expert interview or quote post, and the other is a collection of links about a specific topic. These links lead out to other people’s posts.
For example, this roundup post of 21 blogging tips about what 21 pro bloggers wish they’d known before starting a blog.
While most of this how-to can be applied to both types of roundup, we’re going to focus on the type that links out to other sites’ posts.
These posts allow you to provide high-value, curated content for your audience, without having to create all of it yourself.
It’s a lot easier to list 21 Blogging Tips For New Bloggers From Pros, which gives your audience choices. This way you don’t have to create, photo shoot, write up, edit, make graphics, publish, etc, etc. twenty one different posts yourself!
Just typing that sounds exhausting, no?
Why You Should Write A Roundup Blog Post
Why would you want to write a roundup post? You mean other than not having to write 21 posts about blogging tips yourself?
First, we need to dispel a myth. Creating a link roundup post is NOT faster or easier than popping off 1,000 words on a topic you already understand.
But these posts will be read by far more people than those other posts, and for that reason, as well as several others, they are absolutely worth your while.
Everyone Loves a Good Roundup Post (Including Google!)
Here are just some of the reasons to create posts like these:
- You create a post that gives other bloggers backlinks (win for them)
- You build up good karma and networking in the blogging community (win for everyone)
- You give your audience valuable content (win for them and you)
- You get a post that other bloggers want to share (win for you)
- Because other people share it with their audiences, you get more traffic (win for you)
- Because you get more traffic, you’re able to earn more money (win for you)
Plus, you now have a post that you can repurpose into dozens of social media shares (win for you), that will give the post longevity.
We’ll also show you how to strategically share, to keep those retweets & Facebook shares coming for months to come.
That’s a whole lot of winning for everyone, which makes the effort totally worthwhile!
How to Pick a Stellar Roundup Post Topic
Most of us are not going to be able to rank in organic searches for a high-level keyword phrase like “Keto Lunches” or “Anniversary Gift Ideas” without a long-term, full-on keyword strategy.
You may have heard the phrase “the riches are in the niches” before.
Aside from me being firmly in the neeshes pronunciation camp, this is the perfect application of this saying.
Make your post very specific to your topic, and you will solve the problems of your audience, while also having a shot at ranking in Google for some organic traffic.
Examples of niched-down roundup ideas:
- Keto Lunches -> Vegetarian Keto Lunch Ideas for Work
- Anniversary Gift Ideas -> DIY Paper 1st Anniversary Gifts for My Husband
Get down and specific!
[adsense]Make Sure To Get Permission Before You Put Someone’s Link In A Roundup Blog Post
Before you go around linking to all sorts of websites, it’s important to get permission first.
“I thought everyone wanted links?” is what you’re thinking, right?
Well, to make your roundup post look interesting, you probably are thinking that want to use not just people’s links, but their images, which are their intellectual property.
It’s a big no-no to use images without permission.
Before all else, read this guide for copyright rules that bloggers need to know, and then follow the right steps to get permission.
Additionally, you want to ensure you have permission to use their image in a collage pin, too.
As another point of etiquette, you should not just repurpose someone else’s image into your featured pin image or featured image, because again that would just be taking their intellectual property and using it for free.
A standard way to collect permission is a post that looks like this:
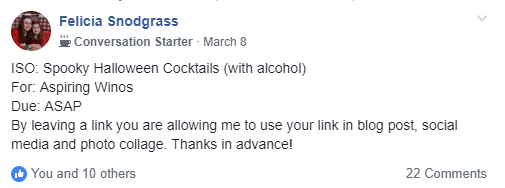
Here’s where it’s time for the secret sauce.
We’re going to use a Google form, to create higher quality, more shareable roundup posts, faster.
If you have never created a Google form before, read about how to create a Google form. They are free and really easy to use, two big plusses in my books.
What Goes Into A Roundup Form and Why
If you have previously created a roundup by posting on Facebook and then collecting the links in the posts, I need to warn you that you will not get as many responses when you use a form.
However, they will be much, much more useful to both you and the other bloggers who respond.
Step 1: Create a Form & Name It With Your Title
In the description, write the name of the website and what the form is creating. If you only want one link per website, mention that in the description box. Also, write the date that you will stop accepting responses if you have a cut-off.
Step 2: Add Your Fields & Guidance
In order to get high-quality responses, you need to show people what you want to see, so be sure to include the description field. You need to turn it on for each question, like this:
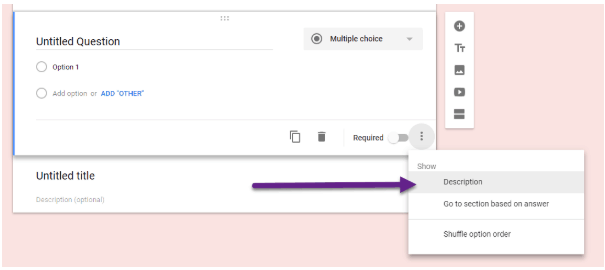
Add the following questions, in this order. Make all of the fields noted with an asterisk required, using the toggle in the bottom right corner of each question.
- Website Name*
- Your Name
- Email Address*
- Blog Post Title*
- Blog Post URL*
- 2-5 Sentence Description of the Blog Post*
- Permission to use an image(s) in a Pinterest collage or social media collage.*
- Twitter Handle
- Instagram Handle
- Facebook Page URL
- Facebook Page Name
Now that you have made one form, with examples, you can simply copy the form and change the title and due dates, going forward. Easy peasy!
I find it easiest to turn on “save responses to spreadsheet”, to work with the information later. Click over to Responses at the top of your form, then click on the green spreadsheet logo.
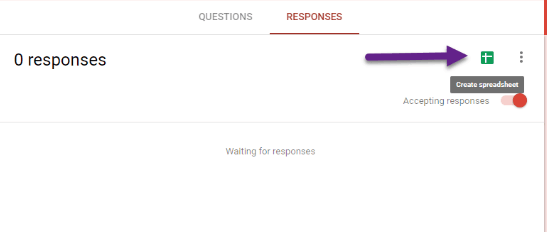
All done!
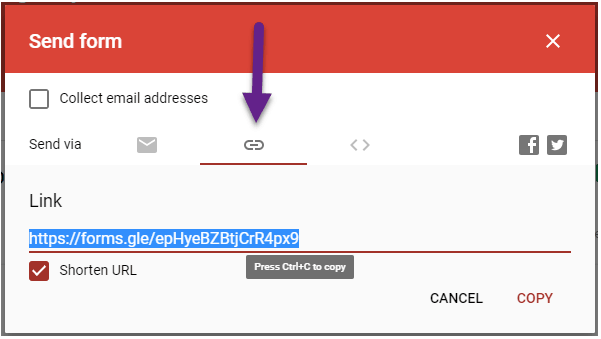
In order to start sharing your form, click SEND in the top right-hand corner of the screen.

Click on the “link” icon and optionally turn on “Shorten URL.”
Where To Crowdsource Your Roundup Post
Now you have a form and a link to it – great! But, where do you post it?
Luckily for us, there are several Facebook groups dedicated to connecting bloggers for roundups.
Note: Several of these groups require that your blog or job as a freelancer be publically viewable on your Facebook profile. If yours isn’t, change that before applying to join.
When you join groups, be sure to follow the rules for each particular group.
Sometimes there is a limit to how long you can leave threads open, or how many threads you can have at a time, amongst other rules.
- Blog Post Roundup Database
- Bloggers Sharing Links for Roundups
- RoundupPalooza
- You can also post your roundup request in the HerPaperRoute group
Organization Tip: Keep a list of links to your Facebook posts, so you can go back and close the threads or delete them, as required by the various groups.
Trello works well for this, or a simple spreadsheet.
Some groups also encourage you to link to the post when it is finished, which you definitely want to do!
Then, Sit Back And Wait
Some roundup topics take off overnight and you are inundated with responses. We already know that we will get fewer responses because you are going to use a form, but sometimes you hit the jackpot!
Tip: In Facebook groups, the threads that get comments are the ones that show near the top of the group.
Your Facebook posts won’t be receiving comments (because you are using the Google form) so your Facebook post can quickly end up very far down the Facebook page. Where no one will see it.
So, every few days, go comment on your own post with “bump” or “still accepting entries” to move it up to the top of the page.
Now is a great time to create a draft blog post and write your introduction and conclusion paragraphs.
Related: How to turn your blog traffic into subscribers and followers on autopilot
Time To Create The Roundup Post
After your form has collected responses, it’s time to go through and pick which posts you would like to use!
Take a look at the posts by clicking on the links in your spreadsheet. I like to colour code lines to indicate if I will use a post or not. Fill them in with light green if you want to use the post, or dark grey if you do not.
As you do the work of pasting into your draft post, change the colour from light green to dark green, so you know which ones are done.

How to Effectively Curate Links
Have you ever read a list post of 100 things and felt completely overwhelmed? That is totally normal!
Let’s make sure your readers don’t get that overwhelmed feeling, either, okay?
When you reach around 25 links, it’s time to group them into sections, to make it easier for readers, while also sneaking in some more good SEO practices.
Figure out what sort of sections you can include. For example, if you were publishing a roundup post about Fourth Of July drinks, you could break it up into two sections:
- Virgin, Non-Alcoholic, Red, White and Blue Mocktails
- Alcoholic Red, White & Blue Drink Recipe Ideas
After you have picked your sections, be sure to mention all of them, and the order they’re in, in your introduction.
This way readers know how to find exactly the section they want to read. Start each section with a Heading 3 formatted heading, full of juicy, relevant keywords.
Don’t Forget Your Own Posts
If you have your own content that’s relevant, include it in your roundup. Make it nice and prominent, too. Put your content first under every relevant section.
How To Format A Roundup Blog Post
One of the hardest parts of a roundup post is formatting it so that it is easy to look at and easy to understand for your readers.
When you are creating your post, you need to think about readability, visual appeal, SEO and organization.
Don’t worry, once you come up with a format, it’s easy to do all of it, all at once!
Here’s how to lay out your post, to do all of the above.
Intro Paragraph
Each post should start with an introduction paragraph, which contains your keyword. Make sure to link to another post on your own website here, too.
Keyword Subtitle
Next, include a Heading 2 formatted subtitle, which also includes your keyword, but isn’t just a repeat of your title.
Short Paragraph
Include a short paragraph before your start into your post, it can be as simple as a sentence like “Here come all the amazing recipes you’ll want to try.”
Blog Post Title 1
Using Heading 3 formatting, insert the title of the first post you want to link to. Make it a link to the article, too.
Image 1
Next, insert an image for that post. Make sure that every image you insert is the same width, to make the post easy on the eyes. The wider, the better!
Post Links
Under each image should be a text link of the name of the article, then the line below should have the name of the host website. It is good etiquette to put the link on the post title, not the blog name.
This way, the blogger is getting some SEO credit for the keywords in their post name. You can also make the post title bold, so it stands out.
Post Description
Finally, paste in the post description from your Google form responses. It’s super duper important to edit the description, for accuracy, typos, and grammar! People make mistakes, so be sure to catch them before you hit publish.
Repeat for All Posts
Follow the same formatting all the way through your post!
Conclusion
Write a short conclusion at the end, so people know they have reached the end of the list. Also include another link to other relevant content on your own site, so people have something to read next!
Bonus Tip
All of your links should open in a new tab, you don’t want people to click on the first post in your roundup and be whisked away from your site forever!
It’s also good etiquette to make sure that your links are do-follow. If you’re not sure what that means, chances are very good your links are do-follow, so don’t worry.
Create Post Images & Pins
It’s almost time to publish your roundup post, whew!
Make sure you set a featured image for your post and create a minimum of two pins, a dozen pins is even better.
Because you asked for permission, you can do collage style pins using the images you have added to your post.
Here are some places to score awesome styled stock photos for free! And here are some Pinterest marketing tips to help you get the most out of your Pinterest traffic.
How to Promote Your Roundup
By this point, you are probably salivating at the idea of hitting the publish button and just being done with it all.
Well, it’s time! Then, we get to move on to the promotion stage, which is even more important than the drafting stage.
Thankfully, because we used a Google form, we have really set ourselves up for success and reaching a wide audience.
Read this guide for some interesting, free ways to promote your blog posts that help boost traffic.
Email Everyone Included in the Roundup
Open a draft email and grab all of the email addresses from your Google spreadsheet, for the people whose posts you included in your roundup. Paste them into the BCC to field.
BCC stands for blind carbon copy, and this is an important etiquette thing, so you are not handing out email addresses to other people.
Note: No one asked to sign up for your email address, so legally you do not have permission to add people to your list.
I do not recommend trying to use your roundup Google form to get permission to add people to your list, it is too much of an unknown for bloggers with already-flooded inboxes, so people will not add their links to your form.
(Read more about email rules and GDPR laws here.)
Use this email template and add your own links and words into the square bracket sections:
Hi Everyone,
Thank you so much for submitting your links to my roundup post. The post is now live [insert post title with a link here].
I will be sharing it over the next few weeks on my social media platforms, including tagging you in the posts. I would love it if you also shared the post, here are some more links:
[Pinterest Image 1]
[Pinterest Image 2] etc
[Facebook Post]
Here are some social media posts you can copy and paste to use on your own platforms if you’d like:
Facebook: We are so excited to be featured in this amazing roundup of [your post topic here], our [your own post title] is in good company. [link to the roundup post].
Twitter: Looking at all of these amazing [post topic here]! Love that our [your own post] is one of them, check them out → [link to the roundup post]
Thanks again for being a part of the roundup and let me know if there is anything I can do to support your blog.
Cheers,
[your name & your site name]
Schedule Social Media Posts
No matter which tool you use (SmarterQueue and Tailwind recommended) it’s time to utilize all of the extra social media info we collected from everyone.
For each platform and each person you have social media info for, schedule a post that tags them. This way you can turn your one roundup of twenty things into twenty Facebook posts, twenty Instagram posts and twenty tweets!
The goal is to stretch them out over time, not hammer your audience with the same post every day for twenty days.
This will create a steadier stream of traffic to your posts, plus give you content to share.
Even better, a few weeks from now, when the folks in your roundup have been tagged, they are likely to share the post again, which gets your post in front of their audience too.
You’re sharing and getting the other bloggers in front of your own audience (winning) and they are sharing you and your post to their audience (winning).
Even if each post is only shared to an audience of 100 people, that means your one post could reach 2000 people on Facebook, 2000 people on Twitter and 2000 people on Instagram.
Guess what? Many bloggers who add links have thousands of followers on various platforms, so your post could very easily be put in front of over 100,000 people.
That’s what makes all of this worthwhile.
That’s How To Efficiently Write A Roundup Post To Skyrocket Blog Traffic
Now you know how to write a roundup post that can skyrocket your blog traffic. I said it would still take work, didn’t I? But it’s work that pays off.
With these steps on how to write a roundup blog post, you now have a solid plan to grow your blog traffic.
By guest writer Anne of UniqueGifter.com
Keep Reading
- How to become a millionaire
- How to start and develop a 6 figure blog
- How to make money blogging, actually
- How to stop living paycheck to paycheck
Follow along on Instagram!


