How To Start A Blog And Monetize 2025: Ultimate Guide To Becoming A Blogger
How to start a blog and make money blogging: A step-by-step guide to starting a blog for free, for beginners. Over the years, I’ve made 7 figures blogging, and today I am sharing my exact process for how anyone can get started blogging today.
Including everything that you need to do to monetize your blog from day 1. Yes, you can monetize your blog from day one! I’m giving away my blueprint for the easiest way to set up a blog.
As an affiliate partner of various brands and sponsored content, HerPaperRoute may earn commission on qualifying purchases. Disclaimer
Step one: Enroll in my step-by-step blogging course – for FREE!
With your free access to my Start A Blog training, you will be able to start your own blog and use it to sell products, promote affiliate links, work with brands, and more.
How To Start A Blog And Monetize It: Ultimate Guide To Becoming A Blogger
This post is updated regularly with new information and tools to help you make the most successful, money-making blog ever!
Ready? Let’s go!
If you are new to the world of blogging, welcome! You are going to be great at it! To begin, we need to discuss how to start a blog that is capable of being monetized, as not all websites are eligible to earn money.
Your blog will be eligible to make money, however, if you follow this guide. By setting up a self-hosted WordPress.org website, it can be monetized.
- How to start a blog?
- What is the easiest way to set up a blog?
- How to start a blog to make money?
- How do you make money blogging?
Answers to all of these questions will be answered in detail.
Blogging is the best! Blogging has allowed me to run a business from home doing something creative that I love, and stay home to raise my kid. All while making a lot more money now than I ever did working for someone else.
Now, I won’t lie, it’s not for everyone, nor is it a one-size-fits-all type of thing. Blogging is a lot of work. If you aren’t passionate about it and excited to sit down in front of your computer every day, then blogging probably isn’t for you.
But aside from that, there are so many different ways that you can run a blog as a business.
HerPaperRoute Blogging Toolkit
Before we dive right into this training, make sure you sign up for access to my members-only Profitable Blog Toolkit, it includes a ton of free resources that will help you develop your blog into a business.
Including a copy of my Blog Monetization Cheatsheet ebook – a MUST-have for any new blogger.
You can access the HerPaperRoute Profitable Blog Toolkit by signing up here.
Why Should You Take My “How To Start Blogging” Advice?
That’s a good question, and I would say, it’s worth giving my blogging advice a listen because I am a total blogging expert. So who am I and why should you listen to me?
I’m Chelsea Clarke, a blogger, website investor and business intermediary, with over a decade in the content marketing game.

Well, I have been blogging and making money at it for over 14 years. I also have a degree in media and spent a good chunk of my 20s as a marketing strategist for big corporations.
I am someone who has built, monetized and sold hundreds of content sites for nearly two decades! I know a lot about many angles of blogging. Including content marketing, tech, seo, strategy, monetization, and affiliate marketing…
Pretty much any blogging question you have, I will know the answer, ha!
Affiliate marketing is my thing! It’s the main source of revenue for the majority of my websites, and it’s something I want to help you utilize too.
I share all of my guides, tips, and resources via free guides right here. I strive to provide easy-to-understand, no b-s advice, and inspiration to new, aspiring and blossoming bloggers, so that you can develop your blog into a money-making business too.
My tutorials always have a money-saving edge to them, as I do my best to provide information about the best low-cost or free options and resources for bloggers.
How I Went From $0 To $1,000,000+ Blogging
I built my first blog in 2004. But back then, I didn’t think of it as a business for many years. Even though I was selling from it and using it as a marketing tool. I still worked a regular day job in marketing and a night job bartending.
That changed in 2017 I quit my job as a corporate marketing manager to get serious about my niche beauty blog, so I could stay home with my new baby.
…I haven’t looked back.
Thanks to affiliate marketing, that blog made a healthy profit, and I sold that blog for $50,000 a year later.
I now spend my time running this blog, HerPaperRoute, as well as a portfolio of niche site projects. I also help other creators buy and sell websites as a broker.
Yes, you don’t have to build a blog from scratch you can just buy an established blog!
But credentials aside, I’m just here in the trenches every day with my blog. I’ve developed this site HerPaperRoute.com into a thriving community for aspiring entrepreneurs – something that is growing faster than I ever expected.
This is a place to learn marketing, blogging and entrepreneurship.
There Are Many Opinions And Blogging Gurus Out There
Even though I may have figured out what works for me, I know that doesn’t mean my way is the only way.
That’s why I spend a lot of my time researching and studying the business of blogging. To see what’s working for people outside of the bubble around me.
It’s important to me to stay on top of the ever-evolving Tilt-A-Whirl of what it takes to be a successful blogger.
So I dig into market and industry trends daily. I’m subscribed to over 300 blogger’s mailing lists (gotta keep an eye on what other bloggers are up to!) and always try to be a supportive, encouraging friend to anyone who wants to get into the business.
I take blogging seriously. I eat, sleep, and breathe blogging! It is my career, my full-time gig, and I am super passionate about it.
I am constantly learning, tweaking, and testing.
And if you approach your own blogging career with an openness to learning and not giving up, there’s no telling what you can do!
So let’s get on with it, shall we?
Becoming A Blogger: The Basics You Must Know
There is an easy and quick way to start a blog, and there’s a right way. If you are planning on turning your blog into a business, don’t cut corners.
It also takes time to see the results from your efforts.
Don’t expect to hit publish and get a flood of traffic to your site, or brands to start throwing cash at you.
So if you are looking to start a blog as just an online journal and don’t want to make money from your blog, then you might as well stop reading here.
However, if you want to start a blog and turn it into a business and actually make money from your hard-earned blogging efforts, keep reading…
How To Set Up A Self-Hosted WordPress Blog And Make Money Blogging
In this guide, we will cover everything you need to know about starting your own blog for free.
Here’s What We Are Going To Do, To Start A Blog From Scratch
- Getting into the mindset of a successful blogger
- Understand what self-hosting is and why it’s important
- Choose A Host
- Set up a self-hosted website with hosting
- Domain registration
- Install WordPress.org. (If you already have hosting elsewhere, you can use this guide to switch)
- Secure installation of https:// SSL certificate.
- Change the permalink structure
- Set up Google Search Console & Analytics
- Install a theme
- Install plugins & Set up website security
- Create content
- Build your blog’s email list
- Begin a social media marketing campaign for your blog
- Monetize & make money from your blog
1. The Mindset Of A Successful Blogger
The first thing you need to know when starting a blog is that it is completely normal to feel overwhelmed in the beginning!
There are so many things to learn, especially when learning how to create a profitable blog – but don’t give up!
Do a little each day, vow to never stop learning and believe that you CAN DO IT. I’m here to help you.
I have tutorials for every step of the way, from how to blog, how to make money blogging and how to grow your network with social media – but first things first, we need to get your blog set up, and set up correctly so that it is capable of being monetized.
I am going to show you exactly how to start your monetizable blog in this tutorial, and it will only take a few minutes.
When you start a blog that is going to make you money, you need to self-host.
2. What Is Self Hosting?
Self-hosting is when you own your own domain, and you pay a company such as BigScoots to allow your site to be viewable and ‘live’ on the Internet.
Paying for this means that you own your website and all of your content – which is extremely important if you want to make money blogging.
Self-hosting means that you do not use a free host (such as Blogger, Tumblr).
Why self-host? What’s wrong with using a free host?
There is actually no such thing as a free host! Even platforms that advertise “free hosting” do actually charge in another way, or they take ownership of your website content and restrict you from monetizing.
Therefore CAUSING YOU TO LOSE MONEY!
When you pay for your hosting and own your domain, you can monetize your blog, meaning you can run ads, join affiliate programs, work with big brands and even add an eCommerce cart/shopping functionality.
Free sites like Tumblr don’t allow ads, limiting your ability to earn income from your blog as well as limiting just about everything else you will want to do.
Because when you use a free host, you don’t own your website or content, the free host owns it and can shut you out whenever they please. That is why it is so important to self-host when you start a blog.
Free sites are not actually ‘free,’ because they limit your ability to earn an income, literally stopping you from making thousands of dollars a year or month!
For example, I launched a new niche blog recently and paid for a year of hosting, which was about $72 for the year.
So on day one, I was out $72, but owning my blog allowed me to monetize it, and that first month I made $1,200!
So although I paid $72 to start it, it allowed me to earn $1,200.
If I hadn’t self-hosted I wouldn’t have been able to monetize my blog and would have made exactly ZERO that first month.
This is why it is recommended that anyone who wants to take their blog seriously and intends to make money with it, purchase their hosting/domain with a reputable host, and run their blog on WordPress.org (not WordPress.com).
Related: What’s the difference between WordPress.org and .com?
I will show you exactly how to do this now so that your blog can be up and running and ready to monetize today.
Good News: Self-hosting Is Actually Affordable
3. To Self-Host You Need A Web Host! Best Web Hosting Providers, Prices & Services Compared
The first step in starting a blog, is choosing your web host. Yes, we are starting your own blog for free but there is just one thing you must pay for and that is the security of a web host.
Your blog needs someplace secure to “live” and that is where a quality web host comes in.
And once you have web hosting, using WordPress on your blog is easy and FREE!
When choosing a host for your blog, you have many options, but my number one recommendation is to go with BigScoots.
You’ve probably heard of Bluehost, and SiteGround, and yes are popular web hosts, and fine choices for newbies. But they have limitations.
To start your blog right, you should get premium hosting. I 100% recommend you use BigScoots.

BigScoots Coupon:
✨ 30% Off ✨
For a limited time, save 30% off at BigScoots when you use code HERPAPERROUTE1 at checkout!
What Is The Best Web Host?
When you start a blog, you don’t have to spend much to get high-quality professional hosting for your site.
As noted, my pick for the best web host is BigScoots as the best option. They offer the very best 24/7 customer support to help you anytime you need it.
However, if you are limited by budget and affordability is more important than quality, then go with Bluehost.
If you would prefer to use Bluehost instead of Bigscoots for hosting your website, read this post to see how to do it.
Note: You do not need BigScoots AND Bluehost! Just pick one or the other.
If you are expecting a lot of traffic right away, you will likely need a more robust host than Bluehost can offer.
So if you are looking for a faster host with more features, again, I would recommend BigScoots as the best option.
BigScoots is only a few dollars more, and they are one of the fastest web hosts around.
4. Set Up Hosting
The next step in how to start a blog is choosing your hosting platform.
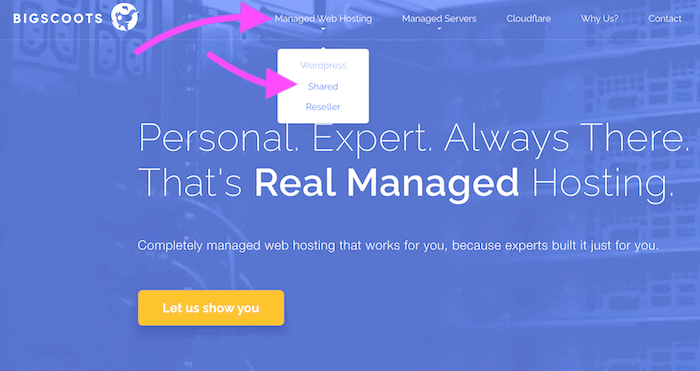
Head over to BigScoots.com and choose your hosting package:
You will get to choose your server type. You can choose from:
- Shared hosting (most affordable, but limited bandwidth)
- or WordPress hosting (cost-effective and with more space and speed)
- or VPS hosting (fastest and most secure, but more of an investment)
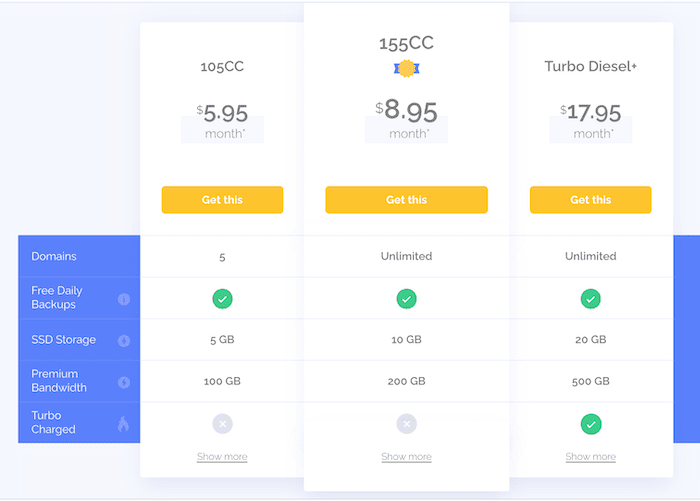
If you opt for shared hosting, you then choose the package:
Whichever server and package you choose is great! Follow the steps to purchase your hosting package, and don’t forget to use my 30% off discount code at checkout: HERPAPERROUTE1
5. Registering A Domain Name & Nailing Your niche
Once you have registered hosting, you will be able to register your desired domain name.
This is what people will type into the address bar to find your site. For example, my domain name is HerPaperRoute.com.
Think about what would be a good domain name for your chosen niche, and try to include your main keyword in the domain, if possible.
If you need help figuring out your niche, and want some fun niche ideas, read this: How to choose a niche for your blog.
Ideally, you will want something that is short, catchy, uses keywords that make sense for your niche, and uses .com (don’t use .net, .org. ect).
When picking your domain name, you want to give it some thought, but don’t get hung up on picking the “perfect” name. If you want to develop a brand, it is very important to keep your name consistent across your site and social media.
Also, try to make sure your blog name is easy to spell and isn’t something too crazy.
Another good resource for choosing a name if you are having trouble coming up with something is the Business Name Generator from Shopify.
You can register your domain right at BigScoots. HOWEVER, I would suggest registering your domain somewhere different (such as Name.com or Whois.com).
Keeping your website and your domain logins separate adds a second layer of security to your business.
Wherever your domain is registered, you just “point” it to Bigscoots, by updating the domains’ nameservers to BigScoot’s nameservers.
Or if you are migrating a website from somewhere else, you can! BigScoots offers free website migrations!
6: Install WordPress With BigScoots
Once you have purchased your hosting package and registered your domain, it will be time to install WordPress.
There are two ways this can be done, depending on your BigScoots account type. Either Cpanel or WPO.
Option 1: Installing WordPress With BigScoots Cpanel
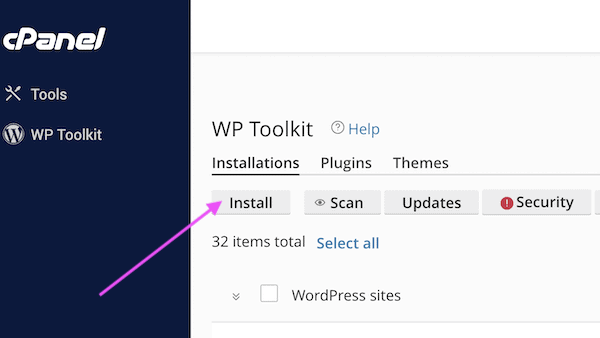
Navigate to WP Toolkit from the Cpanel:
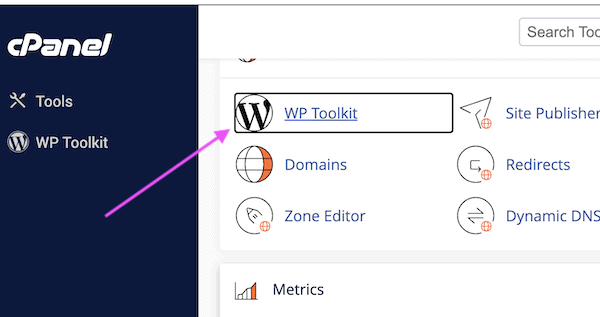
Click the ‘Install’ button:
Fill out the options with details about your website/email:
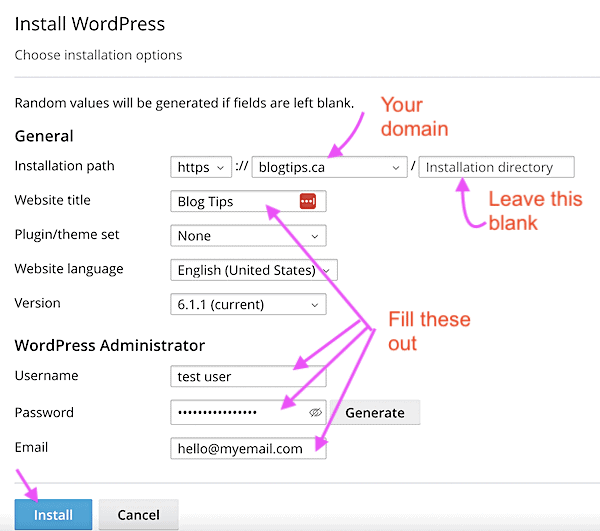
When you hit ‘Install’ BigScoots will install WordPress on your domain, and will give you a login access link.
Option 2: Installing WordPress With BigScoots WPO
Or, if your account uses WPO, here is how to set up WordPress on your Bigscoots account.
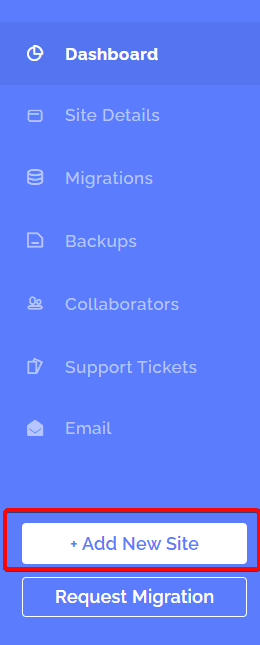
Click ‘Add Newe Site’ and then follow the prompts. Bigscoots will automatically install WordPress.
7. How To Install Secure HTTPS With BigScoots
SSL is a security measure that makes your domain work on https (and not just http). It’s a requirement for Google and most other web browsers.
Bigscoots SSL is automatically installed shortly after you add a new domain to your account.
But it can sometimes take a few hours to activate. In some situations, you may need to take action to complete the process. If so, you’ll receive an email with instructions.
Once that is complete, you will have a working SSL certificate for your domain name!
Congratulations! You Just Set Up Your Blog!
Was that not the easiest way to set up a blog or what? You now have a self-hosted WordPress website that is ready to be monetized!
But before you begin creating blog posts, there are a few necessary tasks we need to do to ensure your website is set up correctly.
8. How To Change The Permalink Structure Of Your Blog
Make sure you change your blog’s permalink structure before you start publishing posts.
Click on “Settings” and then “Permalinks.”
Then select the “Post Name” option.
Your blog post URL will now have the right structure.
9. Connect Google Search Console & Analytics
You must connect Google Search Console as well as Google Analytics to your website right away.
Here is a step-by-step guide on:
10. Install A Theme
You need a quality WordPress theme to make your blog look professional.
From your WordPress dashboard click Appearance » Themes to go to the WordPress theme repository.
There are many good free themes there, but I prefer to use a premium theme because they are more secure, including developer support, and just function better.
I run all of my websites on this theme, and HIGHLY recommend it.
Read this for a step-by-step guide on how to install a WordPress theme.
11. Install Plugins & Security Features
When you first start a new WordPress site, it is very basic, having little to no functions.
You need to add plug-ins to your website to make it complete.
One of the many great things about blogging with WordPress is that you have access to so many great plugins. Plugins are like apps that you install on your site to improve its functions.
Must-Have Free Plugins
These are the free and freemium WordPress plugins that I use the most and recommend to anyone starting a blog.
These are the top free plugins I recommend:
- RankMath SEO
- Askimet Anti-Spam
- Wordfence Security
- WP Hide Login
- Pretty Links
- Broken Link Checker
- Woocommerce (If you want to have an eCommerce shop.)
Essential premium plugins
- For social share buttons, Pinterest pin it button, hiding pins in posts, repin-x pins and more: Social Warfare
- For speeding up your website, minifying CSS and other SEO issues –WP Rocket
- To optimize images for page speed and size: ShortPixel
Learn more about recommended free plugins here.
How To Add A Plugin
The easiest way to add a plugin is to go to Plugins » Add New from your WordPress dashboard and search for the plugin you want.
Then it’s as easy as clicking ‘Install’ and then ‘Activate.’
But you can also upload plugins too.
If you have downloaded a plugin to your computer, here’s how to install it on your blog:
1. You do not need to unzip the .zip file, just leave it as is.
2. Go to your WordPress dashboard and on the left side tab click where it says ‘Plugins’ and click ‘Add New.’
3. On the next screen, you will see a button that says ‘Upload Plugin’ Click that and upload the plugin that you saved to your computer. (You can also use this area to search for new plugins).
4. Once it has been uploaded, you can go to your ‘PlugIns’ tab, find where it is and click ‘Activate.’
12. Create Content & Optimize For SEO
Finally! It’s time to start writing blog posts and other content.
You can write about anything you want to, of course. But it’s wise to write with your reader in mind.
For help with this, here are some tips on how to write blog posts that other people want to read.
You should also learn the basics of SEO (search engine optimization) so that people can actually find your blog. Enroll in my free SEO course for help with this now.
I’d recommend that you write at least 6 blog posts before you go live.
That way, when people visit your site there will be a lot of content for them to read but also so that you can begin applying to affiliate networks right away.
Basic Pages Your Website Needs
In addition to creating blog posts, you will need to create some pages too. Some pages you will need to create:
- Homepage
- An ‘About Me’ page – Here is a guide to writing a high-converting About Me page
- A ‘Contact’ page
- Legal pages (see below)
Legal Pages Your Website Needs
You will also need to make 3 legal pages:
- Disclosure page – tells your readers about your affiliate links policies
- Privacy page – outlines how your website uses cookies, what you do with the emails addresses and personal info of your readers
- Terms And Conditions page – outlines what you are and are not liable for, so people can’t sue you
Ideally, you should use the Legal Bundle Templates as it gives you fill-in-the-blank templates for all 3 of these required legal pages.
Check out my top tools apps and resources for bloggers and read these guides for help in this stage:
13. Build Your Email List
Make it a priority to build your email list from day one. One of the easiest ways to make money blogging is to promote affiliate products in your newsletters.
Seriously! People are much more likely to buy from you once they’ve been ‘warmed up’ by getting to know you from your regular email communications.
Much more so than from just randomly landing on your blog and not knowing who you are.
I recommend ConvertKit as the best professional email service provider to manage subscribers and send newsletters.
Or if you are on a budget, you will get unlimited subscribers for life, for just $15 per month at FloDesk with this link.
Check out these pro tips for email marketing so you can gain more subscribers and earn money from your newsletters. And this list of lead-magnet freebie ideas!
14. Begin Social Media Marketing Campaign For Your Blog
Once you have a good amount of blog posts ready, and your website is looking great, it’s time to launch your website and officially ‘go live.’
This is usually done simply by clicking the button on your WordPress dashboard asking you if you are ready to go live, and then your site will become visible to the world.
If you haven’t already, set up social accounts for your blog. Instagram, Twitter, Facebook and Pinterest are the big ones.
It is recommended that you post to social media every day.
It can be a huge task but I have some tips on how to automate the process, and I’ve written an entire guide to creating a social media game plan here that I think you find super useful!
As well, automating your social media efforts as much as possible is very important and will save you a ton of time.
Read this guide for more information about social media automation.
15. Monetize Your Blog
Once your blog is live it’s time to monetize! So how do you monetize a blog?
Simply put, monetizing means you have add features to your blog that will earn you money.
Naturally, at this point, you may be curious about how bloggers make money. Right?
Check out these resources below. Don’t worry, the links open in a new window so you won’t lose your place here!
- How To Make Money Blogging
- How To Get Blog Sponsorship Deals
- How To Make Money With Affiliate Marketing
Blogs typically have a few of these common monetization features:
- Affiliate Links
- Sponsored Posts
- Ads
- Ebooks
- Courses
- Own Services/Products
To get started with monetizing your blog, I recommend you do the following:
- Start applying to these high-paying affiliate programs
- Make time to learn affiliate marketing
- Enroll in the Blog Monetization Course which will teach you everything you need to know to earn a full-time income from blogging
How To Start A Blog And Monetize It – Conclusion
Congrats On Starting Your New Blog Today!
Just think of how happy you will be by this time next year, for starting this blog today!
Remember to take each day in stride, work a little bit each day, and don’t give up. I’m so happy that you have started!!
I’d love to see how your blog develops! Follow me on your social account of choice, I’m on:
Blog Mentorship Program
Contact me to discuss 1:1 blog coaching. I can help you take your blogging hobby to a full-fledged business.
Don’t forget to download my free Profitable Blog Toolkit here!
Follow along on Instagram!


